
Defining Calculated Members
This page describes how to add calculated members (including calculated measures) to a Business Intelligence cube.
Users can create additional calculated measures, calculated members, and named sets within the Analyzer.
In MDX terminology, a calculated measure is simply another form of calculated member. This documentation uses the nonstandard phrase calculated measure for brevity.
Also see Accessing the Business Intelligence Samples.
Defining a Calculated Measure
To add a calculated measure:
-
Click Add Element.
The system displays a dialog box.
-
For Enter New Item Name, type the name of the measure.
-
Click Calculated Member (Measure).
-
Click OK.
-
Select the calculated measure in the Model Viewer (in the section Calculated Members).
-
Specify the MDX expression that defines the new member. To do so, you can do either of the following:
-
Type the expression directly into Value Expression.
-
Use the Expression Builder. This tool is intended to make it easy to obtain the correct MDX identifier for any part of the cube. To access this tool, click the magnifying glass next to Expression. The left area lists the contents of the cube, including all measures and levels. The right area displays the expression that you are creating. To add an item to the expression, drag and drop it from the left area to the expression. The item is added to the end of the expression, and you might need to move it to a different part of the expression.
The following section has some example expressions. For additional samples, see the HoleFoods and Patients cubes.
-
The Architect displays this new measure with the other measures, in the Measures group.
Also see Specifying Additional Filtering for Listings for a Calculated Measure, later in this page.
MDX Recipes for Calculated Measures
For a calculated measure, the MDX expression that you use as its definition should be a numeric expression. The section Numeric Expressions provides information on all the ways to create numeric expressions in MDX.
For an introduction to InterSystems MDX, see Using InterSystems MDX.
This section discusses recipes for the following scenarios:
-
Filtered measures, which are null in some cases
-
Measures that use KPIs or plug-ins, which are discussed in Advanced Modeling for InterSystems Business Intelligence
For samples, see the HoleFoods and Patients cubes.
Do not define a calculated measure that is based on another calculated measure that is based on a plug-in. (For information on plug-ins, see Advanced Modeling for InterSystems Business Intelligence).
Measures Based on Other Measures
It is common to base one measure on other measures via an Expression like the following:
([MEASURES].[my measure 1] + [MEASURES].[my measure 2]) / [MEASURES].[my measure 3]
More formally, Expression is a numeric-valued MDX expression and can include the following elements:
-
References to measures. The syntax is as follows:
[MEASURES].[measure name]Or:
MEASURES.[measure name]You can omit the square brackets around the measure name, if the measure name contains only alphanumeric characters, does not start with a number, and is not an MDX reserved word.
The expression is not case-sensitive.
-
Numeric literals. For example: 37
-
Percentage literals. For example: 10%
Note that there cannot be any space between the number and the percent sign.
-
Pivot variables. See Defining and Using Pivot Variables.
To refer to a pivot variable, use the syntax $variable.variablename where variablename is the logical variable name. This syntax is not case-sensitive; nor is the pivot variable name.
-
Mathematical operators. InterSystems IRIS Business Intelligence supports the standard mathematical operators: + (addition), - (subtraction), / (division), and * (multiplication). It also supports the standard unary operators: + (positive) and - (negative).
You can also use parentheses to control precedence.
For example: MEASURES.[%COUNT] / 100
-
MDX functions that return numeric values. Many MDX functions return numeric values, including AVG, MAX, COUNT, and others. See the InterSystems MDX Reference for details. The function names are not case-sensitive.
The MDX function IIF is often useful in such expressions, for example, to prevent dividing by zero. It evaluates a condition and returns one of two values, depending on the condition.
Measure That Uses a Pivot Variable As a Multiplier
To define a measure that uses a pivot variable as a multiplier, use an Expression like the following:
measures.[measure A]*$variable.myQueryVariable
Where myQueryVariable is the logical name of a pivot variable. In this scenario, use a literal pivot variable that provides numeric values. See Defining and Using Pivot Variables. The syntax is not case-sensitive; nor is the pivot variable name.
Percentages of Aggregate Values
It is often necessary to calculate percentages of the total record count or percentages of other aggregate values. In such cases, you can use the %MDX function, which is an InterSystems extension. This function executes an MDX subquery, which should return a single value, and returns that value, which is unaffected by the context in which you execute the function. This means that you can calculate percentages with an Expression like the following:
100 * MEASURES.[measure A] / %MDX("SELECT MEASURES.[measure A] ON 0 FROM mycube")
The subquery SELECT MEASURES.[measure A] ON 0 FROM mycube selects the given measure from the cube and aggregates it across all records.
For example:
100 * MEASURES.[%COUNT]/%MDX("SELECT MEASURES.[%COUNT] ON 0 FROM patients")
In the case of the Count measure, you can use a simpler subquery:
100 * MEASURES.[%COUNT]/%MDX("SELECT FROM patients")
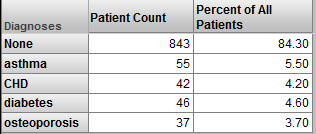
The following shows an example that uses the Percent of All Patients calculated measure, which is defined by the preceding Expression:
Distinct Member Count
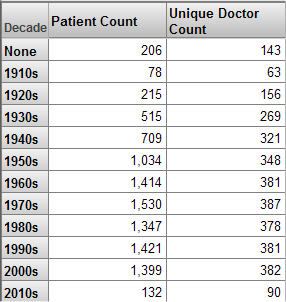
In some cases, for a given cell, you want to count the number of distinct members of some particular level. For example, the DocD dimension includes the levels Doctor Group and Doctor. The calculated measure Unique Doctor Count uses the following Expression, which uses the Doctor level:
COUNT([docd].[h1].[doctor].MEMBERS,EXCLUDEEMPTY)
We can use this measure in a pivot table as follows:
Semi-Additive Measures
A semi-additive measure is a measure that is aggregated across most but not all dimensions. For example, customers’ bank balances cannot be added across time, because a bank balance is a snapshot in time. To create such measures, you can use the %LAST function, an InterSystems extension to MDX.
Consider the following measures:
-
Balance is based on the source property CurrentBalance and is aggregated by summing.
You would avoid aggregating this measure over time, because it would give incorrect results; that is, you should use this measure only in pivot tables that include a time level for rows or columns.
-
Transactions is based on the source property TxCount and is aggregated by summing.
You can define a calculated measure called LastBalance and use the following expression for Expression:
%LAST(Date.Day.Members,Measures.Balance)
The %LAST function returns the last non-missing value for a measure evaluated for each member of the given set. In this case, it finds the last day that has a value and returns that value.
Filtered Measures
A normal measure considers all records in the fact table for which the source value is not null. In some cases, you may want to define a filtered measure, which has the following behavior:
-
The measure is null for certain records.
-
For the other records, the measure has a value.
For a filtered measure, use an Expression like the following:
AGGREGATE([DIMD].[HIER].[LEVEL].[member name],[MEASURES].[my measure])
In this case, the AGGREGATE function aggregates the given value across all the records that belong to the given member.
For example, the Patients sample has the Avg Test Score measure, which is the average test score considering all patients who have a non-null value for the test. Suppose that in addition to the Avg Test Score measure, your customers would like to see another column that just shows the average test scores for patients with coronary heart disease (the CHD diagnosis). That is, the customers would like to have the measure Avg Test Score - CHD. In this case, you can create a calculated measure that has the following Expression:
AGGREGATE(diagd.h1.diagnoses.chd,MEASURES.[avg test score])
Measures That Use KPIs or Plug-ins
For any KPI or plug-in, (all discussed), you can create a calculated measure that retrieves values from it. Then users can drag and drop this measure within the Analyzer.
Business Intelligence does not support calculated measure expressions which retrieve values from plug-ins within cubes which are based on data connector sources. Attempting to evaluate such an expression in that context will yield an SQLCODE -51 error.
To create such a calculated measure, use an MDX expression of the following form for Expression:
%KPI(kpiname,propertyname,seriesname,"%CONTEXT")
Where kpiname is the name of the KPI or plug-in, propertyname is the name of the property or column, and seriesname is the name of the series. You can omit seriesname; if you do, this function accesses the first series in the KPI or plug-in.
For MDX-based KPIs and plug-ins, you can provide a parameter that carries context information. "%CONTEXT" is a special parameter that provides row, column, and filter context to the KPI or plug-in; this information is passed to the base MDX query used by the KPI or plug-in. The default for this parameter is "all", which uses the row, column, and filter context in combination. For additional options, see the %KPI function in the InterSystems MDX Reference.
For example (for a KPI or plug-in with only 1 series):
%KPI("PluginDemo2","Count",,"%CONTEXT")
For another example, you can define a calculated measure that uses the sample median plug-in (%DeepSee.PlugIn.MedianOpens in a new tab). To do so, use the following Expression:
%KPI("%DeepSee.Median","MEDIAN",1,"%measure","Amount Sold","%CONTEXT")
Defining a Calculated Member (Non-Measure)
To add a calculated member that is not a measure:
-
Click Add Element.
The system displays a dialog box.
-
For Enter New Item Name, type the name of the member.
-
Click Calculated Member (Dimension).
-
Click OK.
-
Select the calculated member in the Model Viewer (in the section Calculated Members).
-
For Dimension, type the name of the dimension to which this member belongs.
You can specify any dimension, including an existing dimension that includes non-calculated members or a new dimension.
-
Specify the MDX expression that defines the new member. To do so, you can do either of the following:
-
Type the expression directly into Value Expression.
-
Use the Expression Builder. This tool is intended to make it easy to obtain the correct MDX identifier for any part of the cube. To access this tool, click the magnifying glass next to Expression. The left area lists the contents of the cube, including all measures and levels. The right area displays the expression that you are creating. To add an item to the expression, drag and drop it from the left area to the expression. The item is added to the end of the expression, and you might need to move it to a different part of the expression.
The next section provides some recipes.
For details and examples, see WITH Clause in the InterSystems MDX Reference.
The Patients cube defines some samples; see the ColorD dimension, which includes two calculated members in addition to the standard members.
-
MDX Recipes for Non-Measure Calculated Members
This section provides recipes for non-measure calculated members for some common scenarios.
For general syntax, see WITH Clause in the InterSystems MDX Reference.
For an introduction to InterSystems MDX, see Using InterSystems MDX.
This section discusses recipes for the following scenarios:
-
Combining members of different levels, especially for filtering
For samples, see the Patients cube. The ColorD dimension, which includes two calculated members in addition to the standard members.
Defining Age Members
It is often useful to have members that group records by age. To define such members, use an existing time level and the special NOW member. For example, consider the MonthSold level in the HoleFoods sample. You could define a calculated member named 3 Months Ago with the following Expression:
[dateofsale].[actual].[monthsold].[now-3]
You can define a set of age members, to create groups by age. For example, you could define the following members:
-
Dimension: AgeGroups
Member name: 1 to 2 year(s)
Expression: %OR(DateOfSale.DaySold.[NOW-2y-1d]:[NOW-1y])
-
Dimension: AgeGroups
Member name: 2 to 3 year(s)
Expression: %OR(DateOfSale.DaySold.[NOW-3y-1d]:[NOW-2y])
For more details and options, see NOW Member for Date/Time Levels in the InterSystems MDX Reference.
Aggregating Members
In many cases, it is useful to define a coarser grouping that combines multiple members. To do so, create a non-measure calculated member that has an Expression of the following form:
%OR({member_expression, member_expression,...})
For example:
%OR({[colord].[h1].[favorite color].[red],
[colord].[h1].[favorite color].[blue],
[colord].[h1].[favorite color].[yellow]})
In any case, each non-measure member refers to a set of records. When you create a member that uses the %OR function, you create a new member that refers to all the records that its component members use.
Aggregating Ranges of Dates
Another useful form uses a range of members aggregated by %OR:
%OR(member_expression_1:member_expression_n)
The expression member_expression_1:member_expression_n returns all members from member_expression_1 to member_expression_n, inclusive. This form is particularly useful with time levels, because you can use it to express a range of dates in a compact form.
For time levels, you can also use the special NOW member. The following expression aggregates sales records from 90 days ago through today:
%OR(DateOfSale.DaySold.[NOW-90]:DateOfSale.DaySold.[NOW])
Or use the following equivalent form:
%OR(DateOfSale.DaySold.[NOW-90]:[NOW])
You can also use the %TIMERANGE function, which enables you to define a member that consists of all the members in an open-ended range. For example, the following expression defines a range that starts after the 2009 member:
%TIMERANGE(DateOfSale.YearSold.&[2009],,EXCLUSIVE)
The %TIMERANGE function is supported only with time levels and is not supported with relationships.
You can also use the PERIODSTODATE function to get a range of dates. For example, the following expression gets the range of days from the start of the current year to today and aggregates these days together:
%OR(PERIODSTODATE(DateOfSale.YearSold,DateOfSale.DaySold.[NOW]))
Defining an Aggregation of Members Defined by a Term List
Term lists provide a way to customize a Business Intelligence model without programming. A term list is a simple (but extendable) list of key and value pairs. (See Defining Term Lists.)
You can use term lists in the multiple ways; one is to build a set of members, typically for use in a filter. In this case, you use the %TERMLIST function and the %OR function; create a non-measure calculated member that has a Expression of the following form:
%OR(%TERMLIST(term_list_name))
Where term_list_name is a string that evaluates to the name of a term list.
For example:
%OR(%TERMLIST("My Term List"))
This expression refers to all records that belong to any of the members indicated by the term list (recall that %OR combines the members into a single member).
The %TERMLIST function has an optional second argument; if you specify "EXCLUDE" for this argument, the function returns the set of all members of the level that are not in the term list.
Defining a Member for Filtering on Multiple Dimensions
Member-based filters are so useful that it is worthwhile to create members whose sole purpose is for use in filters. Suppose that you need a filter like the following (which does not show literal syntax):
Status = "discharged" and ERvisit = "yes" and PatientClass="infant"
Also suppose that you need to use this filter in many places.
Rather than defining the filter expression repeatedly, you could define and use a calculated member. For this calculated member, specify Expression as follows:
%OR({member_expression,member_expression,...}
For example:
%OR({BIRTHD].[H1].[YEAR].[NOW],[ALLERSEVD].[H1].[ALLERGY SEVERITIES].[003 LIFE-THREATENING]}
The expression ([BIRTHD].[H1].[YEAR].[NOW],[ALLERSEVD].[H1].[ALLERGY SEVERITIES].[003 LIFE-THREATENING]) is a tuple expression, which is the intersection of the member [BIRTHD].[H1].[YEAR].[NOW] and the member [ALLERSEVD].[H1].[ALLERGY SEVERITIES].[003 LIFE-THREATENING] — that is, all patients who were born in the current year and who have a life-threatening allergy.
Or more generally, use an expression of the following form:
%OR({set_expression})
Specifying Additional Filtering for Listings for a Calculated Measure
By default, when a user displays a detail listing, the system displays one row for each source record that is used in the current context (that is, the context in which the listing was requested). For a given calculated measure, you can specify an additional filter for the system to use when displaying the detail listing.
To specify an additional filter for listings, for a specific calculated measure:
-
Select the calculated measure in the Model Viewer.
-
In Details Area, specify Listing Filter as an MDX filter expression. To create the expression, type directly into this field or click the magnifying glass and create the expression via the editor.
For information on and examples of MDX filter expressions, see Filtering a Subject Area.
Regular measures can also include an additional filter for use when a listing is displayed. The syntax is different but the net effect is the same. For details and an example, see Specifying Additional Filtering for Listings.