
Adding a Level to a Hierarchy
Adding a Level to a Hierarchy
So far, each dimension we have created has contained one hierarchy with one level. In this section, we add a level to the hierarchy in the HomeD dimension.
-
In the Architect, add a level to the HomeD dimension as follows:
-
In the Class Viewer, expand HomeCity.
-
Drag PostalCode and drop it onto the H1 hierarchy within the HomeD dimension.
This step adds the new level PostalCode after the City level.
-
Click PostalCode.
-
In the Details pane, change Name to ZIP Code.
-
-
Compile the cube.
When you do so, the Architect saves the cube.
-
Build the cube. Note in the modal window that Selective Build appears selected by default, and that the levels you've added appear in a list below, each checked for the Selective Build process. The addition of a new column or the modification of an existing column will always prompt for a Selective Build in this fashion.
-
Access the Analyzer.
(If this is open on another browser tab, switch to that tab and click the Analytics > Analyzer link to refresh with the most current model.)
-
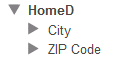
Expand the HomeD dimension in the left. You should see the following:
-
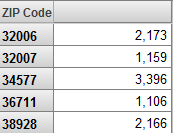
Display the ZIP Code levels as rows. You should see something like this:
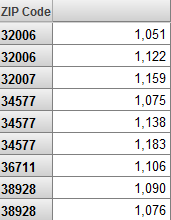
Notice that some members have the same name. It is sometimes correct to have multiple members with the same name. In this case, however, it is an error, because ZIP codes are unique.
There are only two ways in which a level can have multiple members with the same name:
-
The level name is based on a level property, which is not unique. (For an example, see the Doctor level that we defined in the previous article.)
-
The level has a parent level. When the system creates members of a level, it considers not only the source property or expression; it also considers the parent member.
In reality, there is a many-to-many relationship between ZIP codes and cities, so that neither is the parent of the other. In the Patients sample, ZIP codes contain small cities as follows:
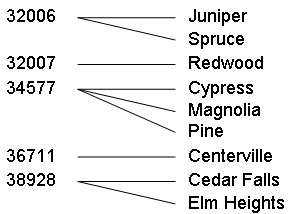
When we added the ZIP Code level, we placed it after the City level, which means that City is the parent of ZIP Code. This affected how the system generated members for ZIP Code. For example, the system assumed that the ZIP code 32006 of the city Juniper was not the same as the ZIP code 32006 of the city Spruce.
-
-
Go back to the Architect and correct the HomeD dimension.
-
Click the ZIP Code level.
-
Click the up arrow button.
-
Compile the cube.
When you do so, the Architect saves the cube.
-
Build the cube.
-
-
Access the Analyzer.
(If this is open on another browser tab, switch to that tab and click the Analytics > Analyzer link to refresh with the most current model.)
-
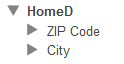
Expand the HomeD dimension in the left. You should see the following, which is now correct:
-
Display the ZIP Code levels as rows. Now you should see something like this, which is correct:
-
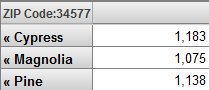
Double-click the row 34577. The system now displays the cities within this ZIP code.
-
Optionally do the following to see how this change has affected the fact and level tables.
-
Access the Management Portal and go to the namespace into which you installed the samples, as described earlier.
-
Click System Explorer > SQL.
-
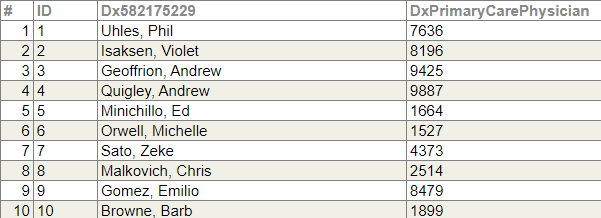
In the left area, navigate to the table Tutorial_Cube.Fact.
Notice that this table now has the field DxPostalCodeViaHomeCity in addition to DxNameViaHomeCity. That is, the fact table stores a value for each level, even the levels are related.
-
In the left area, navigate to and open the table StarNameViaHomeCity.
The system displays something like the following:
Notice that now the table stores, for each city, the ZIP code to which that city belongs.
-
Close this table and navigate to the table Tutorial_Cube.StarPostalCodeViaHomeCity.
The system displays something like the following:
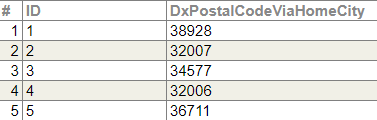
This level table is like the other level tables: one row for each level member.
-