
Adding Levels and Measures
Adding Levels and Measures
In this part of the tutorial, you add some levels and measures to the Tutorial cube.
-
Drag and drop the following items from the Class Viewer (the left area) to the Measures heading in the Model Viewer (the middle area):
-
Age
-
TestScore
This creates measures named Age and TestScore, based on the class properties with those names.
-
-
Make the following changes to the TestScore measure:
-
Click the measure name, below the Measures heading.
-
In the Details pane (the right area), change Name to Test Score
-
Click Searchable.
-
-
Create the Avg Age measure as follows:
-
Drag and drop the Age property again from the Class Viewer to the Measures heading in the Model Viewer.
This step creates a new measure named Age1.
-
Click the measure name in the Model Viewer and then edit the following details in the Details Pane:
-
For Name, specify Avg Age.
-
For Aggregate, choose AVG.
-
For Format String, specify #.##
-
-
-
Create the Avg Test Score measure as follows:
-
Drag and drop the TestScore property again from the Class Viewer to the Measures heading in the Model Viewer. This step creates a new measure named TestScore1.
-
Click the measure name in the Model Viewer and then edit the following details in the Details Pane:
-
For Name, specify Avg Test Score.
-
For Aggregate, choose AVG.
-
For Format String, specify #.##
-
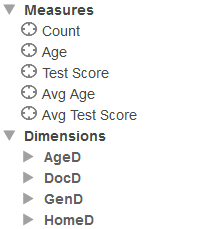
Now you should have four measures:
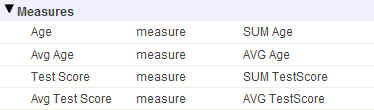
-
-
Click Save and then click OK.
The system updates the cube class.
-
Add a dimension, hierarchy, and level based on the Age property, as follows:
-
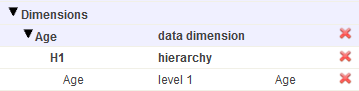
Drag and drop the Age property to the Dimensions heading.
The Architect immediately creates a dimension, hierarchy, and level, and the Model Viewer now displays the following:
-
Click the first Age item, which is labeled data dimension.
-
In the right area, edit Name to be AgeD.
The Model Viewer now displays the following:

Depending on how you plan to use Business Intelligence, users might never see the names of the dimensions. In this tutorial, we follow the convention used in the Patients sample, which assumes that we will not use a dimension as rows or columns in pivot tables (we will instead use levels as rows or columns).
-
Select the option Enable the All level for this dimension.
-
Edit Caption for All member to be All Patients.
-
Edit Display name for All member to be All Patients.
-
-
Save the cube definition in the same way that you did earlier.
-
Add a dimension, hierarchy, and level based on the Gender property. Repeat the previous steps with the following differences:
-
Drag and drop the Gender property.
-
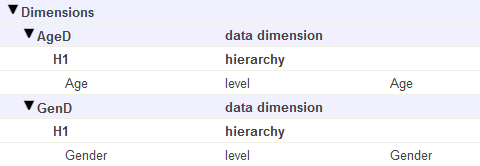
Rename the dimension to GenD.
The Model Viewer now displays the following:
-
-
Add a dimension, hierarchy, and level based on the HomeCity property. Repeat the previous steps with the following differences:
-
Expand the HomeCity property and then drag and drop the Name property within this folder to Dimensions
-
Rename the dimension to HomeD
-
Rename the level to City
For this new dimension, hierarchy, and level, the Model Viewer now displays the following:

Note that in this case, the Property option uses dot syntax.
-
-
Add properties to the City level:
-
Expand HomeCity on the left (in the Class Viewer area).
-
Drag Population and drop it onto the City level in the middle area.
-
Drag PrincipalExport and drop it onto the City level in the middle area.
-
Select the new PrincipalExport property and rename it to Principal Export.
-
-
Add a dimension, hierarchy, and level based on the PrimaryCarePhysician property. To do this:
-
Click Add Element.
-
For Enter New Element Name, type DocD.
-
Click Data Dimension.
-
Click OK.
-
Click New_Level1 in the Model Viewer area.
-
Change Name to Doctor.
-
Select the Expression radio button under the Source Values header and copy the following ObjectScript expression into Expression:
%source.PrimaryCarePhysician.LastName_", "_%source.PrimaryCarePhysician.FirstNameThe variable %source refers to the current record. The system evaluates this expression when it builds the cube.
You could instead use the drag-and-drop procedure as you did earlier, and then edit the definitions.
-
-
Save the cube definition in the same way that you did earlier.
-
Compile and build the cube. To do so:
-
Click Compile, which starts the compilation and displays progress in a dialog box.
-
When the system is finished compiling, click Done.
-
Click Build. Note in the modal window that Selective Build appears selected by default, and that the measures and dimensions you've added appear in a list below, each checked for the Selective Build process. The addition of a new column or the modification of an existing column will always prompt for a Selective Build in this fashion. Click Build.
-
When the system is finished building the cube and its indexes, click Done.
-
-
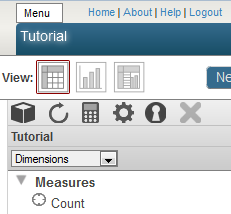
In a separate browser tab or window, open the Analyzer.
Check the upper left area, which displays the title of the currently selected cube or subject area. You should see the following:
If the title is not Tutorial, then click the Change button (
 ), click Tutorial, and click OK.
The left area of the Analyzer displays the current contents of this cube as follows:
If you do not see this, make sure that you have generated data for the sample and that you have compiled and built the cube.