
First Look: Connecting Systems Using Interoperability Productions

This First Look helps you connect systems together with InterSystems IRIS® data platform interoperability productions.

To browse all of the First Looks, including those that can be performed on a free evaluation instance of InterSystems IRISOpens in a new tab, see InterSystems First LooksOpens in a new tab.

Why Connect Systems?

Connecting systems involves allowing messages from one system to be processed by another system. For example, the following scenarios require connecting systems:

  • To improve efficiency, systems originally designed to perform a single function need to be integrated. For example, you can gain efficiency by integrating individual systems that track inventory, order materials, record sales, and control shipping.

  • After a merger, systems that perform the same function in the separate organizations need to work together for the unified organization to be effective.

When connecting systems together, you may be faced with challenges such as:

  • Systems use different communication protocols: one system may use TCP, another uses SOAP, and a third uses REST.

  • Systems use different messages with different formats or based on different standards.

  • You may be required to guarantee that messages are delivered successfully to the right system and be able to detect and correct failures.

  • You have to monitor the system transferring the messages, provide a queue for messages if too many come at one time, and monitor overall system performance to ensure that there aren’t any roadblocks.

While it is possible to code a custom application to connect systems, it is much easier and faster to develop an InterSystems IRIS® production. InterSystems IRIS provides a framework that allows you to connect systems and either minimizes or eliminates the need for custom code.

Introducing Productions

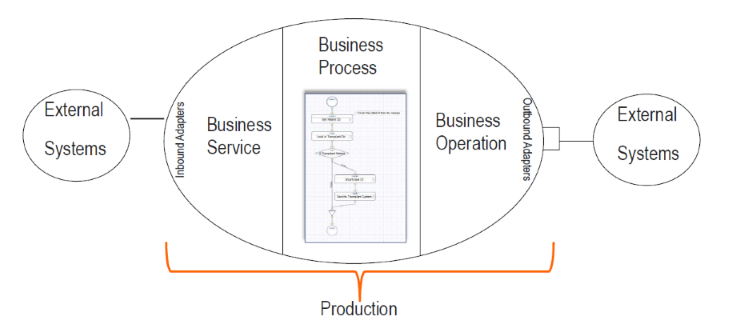
An InterSystems IRIS production is an integration framework for easily connecting systems and for developing applications for interoperability. A production provides built-in connections to a wide variety of message formats and communications protocols. You can easily add other formats and protocols – and define business logic and message transformations either by coding or using graphic wizards. Productions provide persistent storage of messages, which allow you to trace the path of a message and audit whether a message is successfully delivered. A production consists of business services, processes, and operations:

  • Business services connect with external systems and receive messages from them.

  • Business processes allow you to define business logic, including routing and message transformation.

  • Business operations connect with external systems and send the messages to them.

When connecting systems together, it can be challenging to get them to understand the other system’s messages and documents. For example, consider the following problem:

  • You have two separate systems: one is collecting data from multiple networked devices and the other is a work order system that tracks broken devices and the repair process.

  • The current process depends on human intervention to monitor the devices and initiate the repair process. This has caused delays and is unreliable.

  • You have been given the task to connect the two systems together: to monitor the data being collected and to automate initiating the repair process. You know how to detect faulty devices in the data collection system and know how to initiate a repair, but the two systems store data in incompatible formats even when the data represents the same item.

  • You also need to record the actions when a repair is initiated from the data collection system.

You can solve this problem using an InterSystems IRIS production. It provides the framework for defining an interface that accepts messages from the data collection system, transforming the message into one that can be understood by the repair system, and then sending it to the repair system. It also stores a record of the message path.

The following illustrates a simple production:

Produtions consist of inbound adapters, business services, business processes, business operations, and outbound adapters

For demonstration purposes, the production in this document uses file adapters and represents the external systems as files. Because most of the work dealing with the external system is done by adapters provided with InterSystems IRIS, developing a production connecting to the external systems with REST, TCP, SOAP, or HTTP is very similar to developing a production using file adapters.

Try it! Create a Production with File Adapters

In this section, you will create a production using an inbound and outbound file adapter. You will use business services, processes, and operations built into InterSystems IRIS, so you won’t have to download any code.

Before You Begin

To use the procedure, you will need a running InterSystems IRIS instance. Your choices include several types of licensed and free evaluation instances; the instance need not be hosted by the system you are working on (although they must have network access to each other). For information on how to deploy each type of instance if you do not already have one to work with, see Deploying InterSystems IRISOpens in a new tab in InterSystems IRIS Basics: Connecting an IDE. Connect Visual Studio to your InterSystems IRIS instance using the information in InterSystems IRIS Connection InformationOpens in a new tab and .Net IDEsOpens in a new tab in the same document.

Creating an Interoperability-Enabled Namespace

In order to create a production, you must have an interoperability-enabled namespaceOpens in a new tab. If you have already created an interoperability-enabled namespace, you can use that for this production. To create a new interoperability-enabled namespace, use the following procedure. (The namespaces created when you first install InterSystems IRIS are not interoperability-enabled.)

  1. Open the Management Portal for your instance in your browser, using the URL described for your instanceOpens in a new tab in InterSystems IRIS Basics: Connecting an IDE.

  2. Select System Administration > Configuration > System Configuration > Namespaces to go to the Namespaces page.

  3. On the Namespaces page, select Create New Namespace. This displays the New Namespace page; follow the instructions for using this page in Create/Modify a Namespace in the “Configuring InterSystems IRIS” chapter of the System Administration Guide, making sure that the Enable namespace for interoperability productions check-box is selected.

  4. Select Save near the top of the page and then select Close at the end of the resulting log.

Creating a Simple Production with Business Services and Operations

In this step, you will:

  • Create a new production.

  • Add one business service and two business operations to the production.

  • Configure the business service and business operations.

You should now create four directories needed to run this production on the system hosting your InterSystems IRIS instance. The way to do this depends on the type of instance you are using, as follows:

  • For an instance deployed by ICM, use the icm exec command with the -machine and -interactive options to open a bash shell inside the container in which the instance is running, for example:

    icm exec -command bash -machine MYIRIS-AM-TEST-0004 -interactive
    

    You can then create the directories on the container file system.

  • For any containerized instance, whether licensed or Community Edition, use the command docker exec -it container_name bash to open a bash shell in the container (the name of a Community Edition container is try-iris). Then create four directories on the container file system.

  • For InterSystems Learning Labs, use the command-line terminal in the integrated IDE to create new folders in the Shared folder; you can browse to these in the Management Portal under /home/project/shared.

  • For an installed instance, create four directories on the local file system.

This text assumes the following directory paths for an installed instance on a Windows system; substitute the paths of the actual directories you create.

c:\Practice\In
c:\Practice\Out
c:\Practice\PDFsOut
c:\Practice\Work

In the Management Portal, create a new production:

  1. Select Interoperability and, if prompted, select an interoperability-enabled namespace.

  2. Select Interoperability > List > Productions.

  3. If a production is currently running in the namespace, open it, and then select Stop. Return to the production list page.

  4. Select New to create a new production.

  5. Specify a package name, such as TEST, and a production name, such as FileProd. You will be creating a generic production that can be used for any purpose. Select OK to create the production.

Add one business service and two business operations to the production:

  1. Select the Services plus sign to display the Business Service Wizard.

  2. In the Service Class drop-down menu, select EnsLib.File.PassthroughServiceOpens in a new tab.

  3. Specify the Service Name FileService.

  4. Leave the Enabled check box clear.

  5. Select OK.

  6. Repeat these steps for the two business operations. Start by selecting the Operations plus sign to display the Business Operation Wizard. Use the EnsLib.File.PassthroughOperation class for both operations. Name one operation WriteFileOp and the other WritePDFsOp.

Configure the business service and the two business operations:

  1. Select business service that you created in the production configuration diagram, and on the Settings tab:

    1. Select the Enabled check box.

    2. In the File Path field, enter c:\Practice\In.

    3. In the Archive Path field, enter c:\Practice\Work.

    4. In the Work Path field, enter c:\Practice\Work.

    5. In the Target Config Name field, select WriteFileOp.

    6. Leave the other fields with the default values.

    7. Select Apply.

  2. Specify the settings for each of the two business operations. Select the operation in the production diagram and:

    1. Select the Enabled check box.

    2. In the File Path field, enter c:\Practice\Out for the WriteFileOp operation and enter c:\Practice\PDFsOut for the WritePDFsOp operation.

    3. Leave the other fields with the default values.

    4. Select Apply.

Starting the Production and Tracing Messages

After starting the production, you will copy a file to the FileService’s incoming directory. You will be able to view the file in the WriteFileOp’s outgoing directory and trace the message through the production. Note that the WritePDFsOp operation is not used when running the simple production. To start the production and trace the message:

  1. Start the production by selecting Start.

  2. Copy any file into the c:\Practice\In directory. If the production is configured properly, the following should happen:

    • In a few seconds, the file is moved from the c:\Practice\In directory to the c:\Practice\Work directory. A time-stamp is appended to the file specification. For example, if the original file was hello.txt, the work file could have a name such as hello.txt_2018-05-07_17.24.57.056.

    • A new copy of the file is written to the c:\Practice\Out directory. It also has a time stamp appended to it.

    • The circles in the production diagram should stay green. If the circles turn red, it means there’s an error in the production. Go over the preceding steps and ensure that the directories exist.

  3. Select the FileService in the production configuration page and select the Messages tab. It lists each message that went through the production. Select Go To Message Viewer.

  4. Select a message in the Message Viewer and select the Trace tab. It will show that the message went from the FileService to the WriteFileOp operation.

    Message Viewer tracing message from business service to business operation

  5. Select the Body tab and it shows the message type and the fields in the message:

    Body tab displaying the message type along with a table of field values

    Note that the message type is Ens.StreamContainer and that one of its fields is OriginalFilename.

Adding a Router to the Production

In this step, you will add a routing business process, and a rule to your production. Then you will copy a file to the incoming directory and view a trace that shows the message going though the router. In the Management Portal:

  1. Select Interoperability > Configure > Production to get to the Production Configuration page and then select the Processes plus sign to display the Business Process Wizard. In the wizard:

    1. In the Business Process Class drop-down menu, select EnsLib.MsgRouter.RoutingEngine.

    2. Select the Auto-Create Rule check box.

    3. Specify the Business Process Name FileRouter.

    4. Leave the Enabled check box clear.

    5. Select OK.

    6. Select OK to the dialog box to approve the rule class name.

  2. Select FileRouter in the production configuration page, and on the Settings tab:

    1. Select the Enabled check box.

    2. Select Apply.

    3. Select the magnifying glass to the right of the Business Rule Name. This starts the Rule Editor and displays the rule that was automatically generated when you created the business process.

  3. In the Rule Editor, you will create a rule that sends PDF files to the WritePDFsOp operation and all other files to the WriteFileOp operation. Your rule will appear as follows:

    Rule with Condition that equals Document dot Original Filename contains pdf. The Rule Target equals WritePDFsOp

    To create this rule:

    1. Double-click the constraint value in the rule.

    2. Enter FileService in the Source field.

    3. Enter Ens.StreamContainer in the Message Class field.

    4. Select OK.

    5. Select the rule and then select when in the Rule Assistant.

    6. Select the when condition value and enter Document.OriginalFilename Contains ".pdf" in the text box above the rule diagram and then select OK.

    7. Select the when clause in the diagram and then select send in the Rule Assistant.

    8. Double-click the target value and select the WritePDFsOp configuration item.

    9. Select the when clause in the diagram and then select otherwise in the Rule Assistant.

    10. Select the otherwise clause in the diagram and then select send in the Rule Assistant.

    11. Double-click this send clause’s target value and select the WriteFileOp configuration item.

    12. Select Save.

  4. Return to the Production Configuration page, select FileService and on the Settings tab: and

    1. Select the Target Config Name FileRouter check box.

    2. Clear the WriteFileOp check box.

    3. Then select Apply.

Your production is now complete. The FileService will send all messages to the FileRouter business process. The FileRouter will either send the message to the WritePDFsOp or the WriteFileOp operations based on the rule.

If you copy hello.pdf to the c:\Practice\In directory, it will be sent to the c:\Practice\PDFsOut directory, but, if you copy test.txt to the c:\Practice\In directory, it will be sent to the c:\Practice\Out directory. You can also view the message traces showing these paths through the file router. For example, hello.pdf would have a trace such as:

Message trace showing route of PDF from business service to business operation

Learn More About Interoperability Productions

For more information about productions, see:

FeedbackOpens in a new tab