
Monitoring Alerts
Alerts are automatic notifications triggered by specified events or thresholds being exceeded. This topic describes how to configure and monitor alerts.
Introduction
Alerts provide a way for InterSystems IRIS® data platform to automatically notify users about a serious problem or condition that requires a quick resolution to ensure that the production continues operating normally. When properly configured InterSystems IRIS generates alerts for potentially serious problems and should not generate any alerts caused by normal variations in the production performance.
The other monitoring features described in this document require the user to actively check for a problem. Typically, users only check for a problem after it has had a noticeable impact on the production’s performance. Once you have configured alerts to notify users automatically, alerts may make it possible to resolve issues before they have a serious impact on performance and become critical problems.
InterSystems IRIS can automatically send an alert message to users when specified thresholds are exceeded, when specified events occur, or when user code explicitly generates alerts. You can process alerts in a number of ways:
-
Alerts are only written to a log file and there is no automatic notification.
-
A simple alert notification system, where all alerts get sent to a list of users.
-
Routing alert notification where selected alerts are sent to different users depending on the kind of alert and the component that generated it.
-
An alert management framework that notifies users about alerts, escalates unresolved alerts, and documents the current state and history of actions taken to resolve the alert.
In configuring any alert notification system, it is important to calibrate the level that triggers the alert and ensure that the users being notified understand the alert and know how to respond. If the trigger level is set too high, problems may already have a significant impact on performance before InterSystems IRIS notifies users. But, if the trigger level is set too low, InterSystems IRIS sends out many notifications during the normal operation of the production and users tend to ignore these notifications and may not respond to the few critical ones among them.
Alerts are messages of type Ens.AlertRequestOpens in a new tab that can be generated by any business service, process, or operation in a production. InterSystems IRIS always stores alerts messages in the log. If there is a production component named Ens.Alert, InterSystems IRIS sends all alert messages to it. Ens.Alert typically is an operation, such as EnsLib.EMail.AlertOperationOpens in a new tab, a routing process, or the Alert Manager, which has the class Ens.Alerting.AlertManagerOpens in a new tab.
Choosing How to Handle Alerts
To choose how to handle alerts in your production, you should first answer the following questions:
-
Do you want alert notifications to be automatically sent to users or do you want no automatic notification and require the user to view the alerts in the log?
-
Do you want to send all alerts to the same group of users by the same transmission mechanism or do you want to select alerts to go to different sets of users possibly by different mechanisms and possibly not send some alerts to any users?
-
Do you want to assign an owner to an alert, track whether the issue has been dealt with and the alert closed, possibly escalate and reassign the alert, and be able to view the alert status and history including how long it took to resolve the issue?
In all cases, you should define what conditions generate alerts as described in Calibrating Alert Sensitivity. Once you have done that:
-
If you don’t want automatic notification, you are done. Your production should not have a component named Ens.Alert. InterSystems IRIS will write alerts to the log file but will not do anything else with them.
-
If you want to send all alerts to a single list of users by the same mechanism but do not want to track and manage alerts, add an operation with a class such as EnsLib.EMail.AlertOperationOpens in a new tab and name the component Ens.Alert. InterSystems IRIS sends all alerts to the operation and it notifies the configured users. See Configuring Simple Notifications.
-
If you want the capability to route alerts to a set of users and other alerts to other users or to none but do not want to track and manage alerts, add a routing engine to your production and name it Ens.Alert. You will also need to add alert operations, such as EnsLib.EMail.AlertOperationOpens in a new tab. See Configuring Alert Routing.
-
Finally, if you want to manage your alerts so that you can assign alerts to users, track the status of alerts, and manage the alerts, add an Alert Manager, Notification Manager, one or more Alert operations, and, optionally, an Alert Monitor to your production. See Configuring Alert Management.
Calibrating Alert Sensitivity
Ideally you would like to generate alerts only for conditions that require investigation and resolution and not generate alerts when the production is behaving normally, but in order to generate alerts for all serious conditions, you typically will also get some alerts from the normal variation of production execution. For example, you could set the inactivity timeout for a business service at 300 seconds. During peak hours, this business service may get many requests during a 300 second interval and, if no requests come in during that interval, it probably indicates a problem that should generate an alert. However during off-peak hours, there may be no requests for longer periods with all systems operating correctly. To set the system to catch the important alerts during the peak period, you will generate false positive alerts during the off-peak period. If you are using a router or the Alert Manager, you can suppress notifications for these off-peak alerts.
Each business service, process, and operation in a production can generate alerts when it encounters an error or exceeds a limit. You calibrate alert sensitivity by configuring the alert and error settings for each business service, process, and operation. After you configure these production settings, you should monitor the production during normal operation. If there are large numbers of false positive alerts or missed alerts for serious conditions, you should adjust the settings.
The following settings specify the conditions under which InterSystems IRIS generates alerts:
Check this option if you want the component to generate an alert when it encounters an error. Other production settings control what conditions are considered errors. These settings are described later in this section.
Do not check Alert On Error on any component that is involved in delivering or processing alerts.
This is a time in seconds that the component will retry sending its output before issuing an alert. This setting is most commonly used for business operations. If the component is retrying and eventually succeeds within this time there will be no alert. Setting this to a value such as 60 seconds will suppress alerts on transient issues such as a dropped network connection that fixes itself, but won’t wait too long before alerting you to a real problem.
This is a time in seconds that the component will wait for a request before issuing an alert. This is typically used for business services. If you set it to a value such as 300 seconds for a busy system you will be alerted fairly quickly if you stop receiving messages. For quieter systems you might want a longer interval. This value applies all day, so you might get false positives on off-peak times, when traffic is much lower than normal, but you can filter these in your alert handler if necessary.
This is a time in seconds that a message can stay on a queue before it generates an alert. Setting this to a value such as 300 seconds would be a good starting point. For critical systems, 5 minutes might be too long, but for other less critical systems a longer interval may be appropriate.
Specifies the number of items on a queue. When the queue size reaches this number InterSystems IRIS generates an alert. Setting this to a value such as 10 causes an alert when a queue starts to build on a critical item indicating some delay. But some queues may get this large during normal operation and if a component receives a nightly batch of work, setting this parameter may cause unnecessary alerts.
In routers that provide validation, this setting specifies that any message that fails the specified validation generates an alert. This alert is in addition to sending the original message to the bad message handler.
There are many settings that control what conditions InterSystems IRIS treats as errors. If Alert On Error is checked, these settings control what conditions generate alerts. The following are some commonly used settings that control error conditions:
If this is a positive integer, the connection is dropped and an error is issued after that number of seconds with no activity. Setting this to -1 means never disconnect and never cause an error on a disconnect from the other end. A large value such as 99999 means the connection will be dropped after an extremely long period of inactivity, but has the side effect of not causing an error if the other end drops the connection.
Specifies the number of seconds to retry sending a message before failing and considering it an error. Setting this property to –1 instructs InterSystems IRIS to continue to retry sending the message indefinitely and to not fail. Typically, this is the setting to use for critical messages that must be processed in FIFO order. If Failure Timeout is set to a positive integer, the operation fails after this number of seconds, discards the current message and attempts to process the next message.
This setting determines how the operation responds when the target application returns an error reply code. This is a critical setting that determines the operation behavior for a failure. The values are fairly complex but hover text help is available by clicking on the ‘Replycode Action’ label in config settings tab. Typically an operation should retry indefinitely if there is an error sending the message. To ensure indefinite retries after all NACKs set FailureTimeout to -1 and ReplyCodeAction to :?R=RF and :?E=RF. If the target application rejects the message (AR) retrying will probably have the same results so you might want to do something different. However applications can’t always be relied on to use the ACK codes correctly and each application should be considered individually. One option is to disable the business operation after a rejected message but that stops all traffic. Suspending rejected messages until the problem can be fixed will allow other messages to flow but will break the FIFO ordering.
Configuring Alert Monitoring
Alerts are messages generated by production components. InterSystems IRIS automatically writes the alerts to a log file and sends then to the production component named Ens.Alert. If your production does not have a component named Ens.Alert, then InterSystems IRIS writes alerts to the log file but does not send them to any component. The component named Ens.Alert can be of any class. The most frequently used classes for Ens.Alert are:
-
An operation class that sends the alert via email or another mechanism. See Configuring Simple Notifications.
-
A router class that can direct selected alerts to one or more operations. See Configuring Alert Routing.
-
The Alert Manager class that provides a mechanism to document and track the progress in handling the problem indicated by the alert. See Configuring Alert Management.
This section discusses:
Configuring Simple Notifications
If you can handle all the alerts via the same output mechanism and all alerts are to be sent to the same list of users, you can use an operation class as the component named Ens.Alert. To send alerts by email, use the EnsLib.EMail.AlertOperationOpens in a new tab class. To use another mechanism, you must develop a new operation. See Using a Simple Outbound Adapter Alert Processor for details.
If you are using the EnsLib.EMail.AlertOperationOpens in a new tab class, you should specify the following configuration settings:
-
SMTP Server—specifies the address of the email server.
-
SMTP Port—specifies the port that the SMTP server uses.
-
Credentials—specifies the production credentials that provide access to the SMTP server. See Defining Production Credentials.
-
Recipients—specifies the list of email addresses where the alerts are to be sent. You can separate the email addresses with a comma or semicolon.
-
Cc—specifies the list of email addresses that should receive a copy of the message.
-
UseDetailedSettings—if checked, the email subject is “InterSystems IRIS Alert from configuration item component-name on system InterSystemsIRIS-Instance-Name and the message body includes the following information in the email message:
-
Alert Text
-
Alert Time
-
Production
-
Source
-
Session
-
System
-
Instance
-
Node
If UseDetailedSettings is not checked, the email message contains only the alert text and the email subject is “InterSystems IRIS Alert from configuration item InterSystemsIRIS-Instance-Name:component-name, The default is to not check this setting for compatibility with previous versions.
-
-
SubjectPrefix— if UseDetailedSettings is checked, this setting specifies text that is prepended to the email subject.
-
IncludeNodeinSubject—if UseDetailedSettings is checked, this setting specifies that the server address should be included in the email subject.
-
IncludeManagedAlertHistory—this setting is not used when configuring simple notifications.
-
SystemName— if UseDetailedSettings is checked, this setting specifies text to be used in place of the InterSystems IRIS-Instance-Name.
Configuring Alert Routing
If you need to contact users via multiple output mechanisms or you need to send alerts selectively to specified users, add a business process named Ens.Alert with a EnsLib.MsgRouter.RoutingEngineOpens in a new tab class. In this case, your production must also contain a business operation for each output mechanism, and the alert processor forwards messages to those business operations.
The business process would examine the messages and forward them to different business operations, depending on the alert contents and any logic that you include.
Your logic may need to consider the following factors:
-
Different requirements for various users
-
Different requirements depending on the time of day
-
The organization’s problem-solving policies and procedures
The EnsLib.MsgRouter.RoutingEngineOpens in a new tab class provides the setting Business Rule Name. If you specify this setting as the name of a routing rule set, this business host uses the logic in that rule set to forward all the messages that it receives. To use the routing rule to specify the addresses to send the alert, you can add a transformation that sets the AlertDestination property of the Ens.AlertRequestOpens in a new tab class. The addresses specified in the AlertDestination property are added to any addresses specified in the Recipients setting.
Configuring Alert Management
Managed alerts are persistent messages that provide a record of what problems occurred in a production, who responded to the problems, what they did to resolve the problems, and how much time it took to resolve the problems. Alert Management can notify key personnel of alerts that are not resolved promptly.
Alert management provides alert routing capability plus the tools needed to track and resolve alerts. Alert management allows you to assign an alert to a specific user, track whether the alert has been resolved or escalated, and report the time that it took to resolve the alert. Alert management can be added to a production using the InterSystems IRIS management portal including the rule and transformation editors without writing custom code. For specialized requirements, it is possible to add custom code in the alert management production components. See Adding Custom Code to Alert Management for more information.
The Alert Management framework consists of the following business services, processes, and operations:
-
Alert Manager
-
Typically is named Ens.Alert.
-
Receives alerts generated by business services, processes, and operations in the production.
-
Converts them to managed alerts and assigns an owner using a business rule.
-
Sends the managed alerts to the Notification Manager.
-
-
Notification Manager
-
Receives managed alerts from Alert Manager and Alert Monitor.
-
Sends them to alert operation so that the specified users are notified using a transformation.
-
-
Alert operation
-
Sends alert notifications to users using email or another mechanism.
-
-
Alert Monitor
-
Queries database for managed alerts that have passed the next action deadline without being updated or closed.
-
Sends a reminder notification, updates the NextMonitorTime, and escalates the alert using a business rule.
-
-
Interoperability > Monitor > Alerts page displays the status of alerts. If you
-
Display and update open alerts.
-
Tabs allow you to see your alerts, unassigned alerts, and all alerts. Alerts are organized by the alert’s next action time.
-
-
Interoperability > View > Managed Alerts page provides read-only access to managed alerts. You can view alerts but you cannot update them. You can search for alerts based on owner, open status, time, escalation level, source, and alert group.
The following figure illustrates how the components in the alert management framework are connected.

The %EnsRole_AlertAdministrator role allows a user to update any alert, including an alert that is assigned to another user. The %EnsRole_AlertOperator role allows a user to update any alert assigned to that user and to update unassigned alerts.
The following sections describe how to add and configure the alert management components:
Configuring Alert Management in Production Settings
The production settings Alerting Control group is used only for alert management. If you are not using alert management, you can leave these fields blank. If you are using alert management, set these fields as follows:
-
Alert Notification Manager—Enter the name that of the Notification Manager.
-
Alert Notification Operation—Enter the name of the email alert operation.
-
Alert Notification Recipients—Enter valid email addresses, separated by commas. By default, the alert management sends all alert notifications to this email address list. If you use the Alert Notification Manager rule to specify destinations for the messages, this field is not used.
-
Alert Action Window—Enter a number of minutes. This is the default number of minutes that a user has to resolve and close an alert before the next reminder message is sent. If you include the Alert Monitor in your production, by default it sends a reminder after the specified number of minutes have expired and resets the notification time for the managed alert by adding the specified number of minutes to the current time.
If you are sending alert notifications to different distribution lists based on the component that generated the alert, it is useful to specify what alert groups each component belongs to.
Defining Alert Groups
If you are sending alert notifications to different distribution lists based on the component that generated the alert, it is useful to specify what alert groups each component belongs to. For large productions with many components, it is more practical to select a subset of alerts based on alert groups than on the individual component names. You specify the alert groups for a component as a string containing a list of alert groups separated by commas. You specify a component’s alert groups in the AlertGroups property. Once you have defined an alert group for one component, you can select it using the check box for another component.
Adding the Alert Manager and Defining Its Rule
The alert processor must be a business process named Ens.Alert. Typically, if you are using the Alert Manager, you add a business process named Ens.Alert with the class Ens.Alerting.AlertManagerOpens in a new tab. If you are adding alert management to a production that already has a router alert processor, you could keep the router named Ens.Alert and have it send some or all of the alerts to the Alert Manager business process.
If you do not define a rule for the Alert Manager, it promotes all alerts to managed alerts, leaves alerts unassigned, sets the deadline based on the number of minutes specified in the Alert Action Window, and sends all managed alerts to the Notification Manager.
To use a rule for the Alert Manager, create a rule and specify the Creation Rule for Managed Alert type in the rule wizard. This creates a rule with a Ens.Alertiing.Context.CreateAlert context. The alert context provides access to:
-
AlertRequest—the incoming alert. You only have read access to the alert. If the rule makes any changes to the alert, they are ignored.
-
AlertGroups—the alert groups configured for the component that originated the alert.
-
BusinessPartner—the business partner configured for the component that originated the alert.
-
Owner—if the rule sets this property, the Alert Manager assigns the managed alert to the specified user.
The rule can suppress promoting the alert to a Managed Alert by returning 0 or can promote the alert to a Managed Alert by returning 1.
The rule can check whether the alert is a repeat occurrence of a previous alert that is represented by a currently open managed alert. To do this, the rule uses the Ens.Alerting.Rule.FunctionSet.IsRecentManagedAlert() function. The IsRecentManagedAlert() function tests if there is a recent open managed alert that is from the same component and has the same text as the specified alert. You can optionally specify that the function adds a reoccurs action to the existing managed alert.
After you have defined the rule, you specify the rule name in the Alert Manager configuration as the CreateManagedAlertRule property. If you need to customize the Alert Manager in ways that the rule does not allow, you can implement a subclass of Ens.Alerting.AlertManagerOpens in a new tab and override the OnProcessAlertRequest() method. See Adding Custom Code to Alert Management.
Adding the Notification Manager and Defining Its Data Transformation
To add the Notification Manager, add a business process with class Ens.Alerting.NotificationManagerOpens in a new tab. If you do not define a rule, the Notification Manager sends all managed alert messages and reminders to the email addresses set in the Alert Notification List using the operation set in the Alert Notification Operation.
To use a data transformation with the Notification Manager, create a data transformation following these instructions:
-
Specify the Source Class as Ens.Alerting.NotificationRequestOpens in a new tab.
-
Specify the Target Class as Ens.Alerting.Context.NotifyOpens in a new tab.
-
On the Transform tab of the data transformation editor, set the Create property to existing.
Since the Notification Manager sets the target NotificationRequest before executing the data transformation, you do not need to copy any of the alert information from the source to the target. You should set the following in the target:
-
target.Notify—set to 1 to send a notification and set to 0 to suppress the notification.
-
target.Targets—add an element to the collection for each different alert operation that you are using. If you are only using one alert operation, there should only be one element in Targets. Each element contains:
-
TargetConfigName—specifies the name of the alert operation.
-
AlertDestinations—is a collection where each element specifies a single destination address for the alert operation. The format of the address depends on the requirements of the alert operation. Operations with the class EnsLib.EMail.AlertOperationOpens in a new tab take email addresses, but an operation that sends text messages could take a phone number.
-
Your rule should not modify target.NotificationRequest. If you add any destinations to the NotificationRequest, they are ignored.
Once you have defined the data transformation, on the production configuration page, select the Notification Manager and set the NotificationTransform to the transformation that you have defined.
If you need to customize the Notification Manager in ways that the data transformation does not allow, you can implement a subclass of Ens.Alerting.NotificationManagerOpens in a new tab and override the OnProcessNotificationRequest() method. See Adding Custom Code to Alert Management.
Adding and Configuring Notification Operations
To use the email alert operation provided with InterSystems IRIS, add an operation with the class EnsLib.EMail.AlertOperationOpens in a new tab, and enter the following settings in the Basic Settings and the Additional Settings group:
-
SMTP Server—Specify the name of the server.
-
SMTP Port—Update the port if the server does not use the standard port.
-
Credentials—You have to create credentials using the Interoperability > Configure > Credentials page to specify a username and password that can use the SMTP server to send email. Then specify the credentials in this field.
-
Recipient and Cc fields—You can leave these fields blank. If you enter email addresses here, all alerts that are sent through this operation will always be send to these addresses in addition to any addresses specified by the production-wide settings or by the Notification Manager.
-
From—Enter a valid email address.
-
IncludeDetails—This field is used only for messages of type Ens.AlertRequestOpens in a new tab, which are unmanaged alerts. For unmanaged alerts checking this setting includes additional information in the email. This setting is ignored for managed alerts.
-
SubjectPreface—Specify text that is prefixed to the beginning of subject lines on the alert email message. By default the subject line is “InterSystems IRIS ManagedAlert from configuration item 'ComponentName’ on system 'InterSystems IRISProcessName'.
-
IncludeNodeInSubject—If checked, the node name (computer name) is included in the subject line.
-
IncludeManagedAlertHistory—Controls whether the managed alert update history is included in the email message and whether they are list oldest or newest update first.
-
SystemName—Replaces the process name in the subject line.
-
IncludeUTCTimes check box—if checked, the email message includes the UTC time as well as the local time.
Adding the Optional Alert Monitor and Defining Its Rule
The Alert Monitor is optional. It controls whether overdue alerts are escalated and whether reminder notices are to be sent. To add an alert monitor, add a Business service with class Ens.Alerting.AlertMonitorOpens in a new tab. If you do not include the alert monitor, there are no automatic reminders and no automatic escalations.
If you do not define a rule, the alert monitor sends out reminder notices when a managed alert is still open and its NextMonitorTime has passed. It resets the NextMonitorTime by incrementing it with the number of minutes specified in the Alert Action Window production setting. It does not escalate alerts.
To use a rule for the Alert Monitor, create a rule and specify the Overdue Rule for Managed Alert type in the rule wizard. This creates a rule with a Ens.Alertiing.Context.OverdueAlert context. The alert context provides access to:
-
ManagedAlert—provides read access to the managed alert.
-
CurrentTime—provides the current time in UTC format.
-
NewNextActionTime—allows you to set the NextActionTime to a UTC format date-time value.
-
NewEscalationLevel—allows you to set the escalation level of the managed alert.
If the rule returns 1, the Alert Monitor sends the managed alert to the Notification Monitor. If the rule returns 0, no reminder message is sent.
If you set the New Next Action Time, the Alert Monitor sets the NextMonitorTime to the same time. If you do not set the New Next Action Time, the Alert Monitor takes its default action, which is to set the NextMonitorTime to the current time plus the number of minutes specified in the Alert Action Window production setting.
If you need to customize the Alert Monitor in ways that the rule does not allow, you can implement a subclass of Ens.Alerting.AlertMonitorOpens in a new tab and override the OnProcessOverdueAlert() method. See Adding Custom Code to Alert Management.
Monitoring, Tracking, and Resolving Managed Alerts
Managed alerts are a special kind of persistent message. The Alert Manager generates a managed alert when it receives an alert that meets the specified conditions. The following figure illustrates the life cycle of a managed alert: from the component creating the alert to a user resolving the problem indicated by the alert and closing the managed alert.

This figure illustrates the life cycle of a typical managed alert:
-
A business service, process, or operation encounters a specified condition and generates an alert.
-
The alert is sent to the Alert Manager, which is a business process named Ens.Alert. The alert manager promotes the alert to a managed alert, assigns it to a user, and sends it to the notification manager.
-
The Notification Manager determines what group of users to contact and how to contact them. It sends the Managed Alert to an alert operation, which sends notifications to a group.
-
The owner of the managed alert does not solve the problem or update the managed alert.
-
The alert monitor queries for alerts that are still open when the alert’s NextMonitorTime has been reached. It finds the managed alert. It escalates the alert and sends it to the notification manager.
-
The Notification Manager determines what group of users to contact and how to contact them. Since the alert is escalated it sends it to a different distribution list. It sends the Managed Alert to an alert operation, which sends email to a group.
-
In this case the user is able to solve the problem that caused the initial alert. The user updates the managed alert to close the alert.
-
The managed alert is now inactive but contains the alert history and remains available for reports and analysis.
Acting on Alerts by Viewing My Managed Alerts
After you have received an email or other message indicating that there is a managed alert that requires your action, you can view the open managed alerts that are assigned to you or that are unassigned by selecting Interoperability, Monitor, and My Managed Alerts.
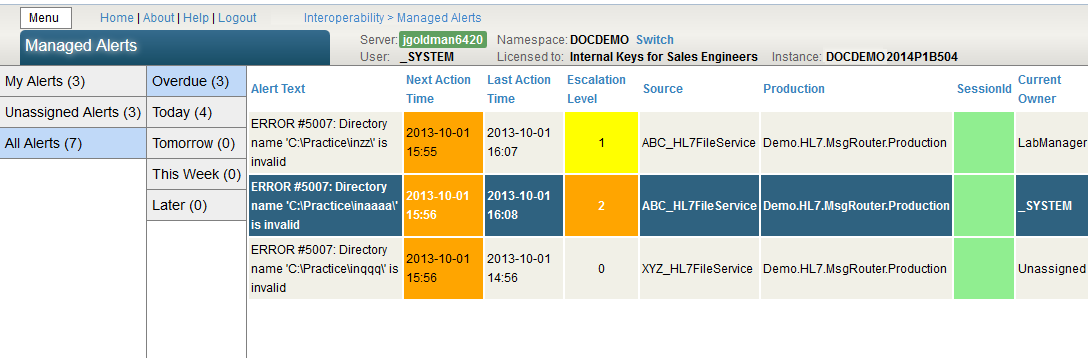
You can view My Alerts, Unassigned Alerts, or All Alerts. You can select alerts that are:
-
Overdue—the Next Action Time has past.
-
Today—the Next Action Time is today.
-
Tomorrow—the Next Action Time is tomorrow.
-
This Week—the Next Action Time is in the next 7 days.
-
Later—the Next Action Time is after the next 7 days.
The table displays the following information about the alerts:
-
Alert Text—the text defined for the alert.
-
Next Action Time—the deadline for resolving the issue causing the alert. If the alert is not closed by this deadline, the alert monitor will evaluate the alert and may escalate or reassign the alert.
-
Last Action Time—the previous time the managed alert was updated.
-
Escalation Level—Alerts by default are created with a 0 Escalation Level. When the alert is escalated, the Escalation Level field is colored to indicate the escalation level:
-
0: No color
-
1: Yellow
-
2: Orange
-
3: Red
-
-
Source—name of the component causing the alert.
-
Production—name of the production.
-
SessionId—not used.
-
Current Owner—current owner or shown as “Unassigned”.
To display the alert details and to update the alert, select the alert in the list. The Managed Alert Details form is displayed.
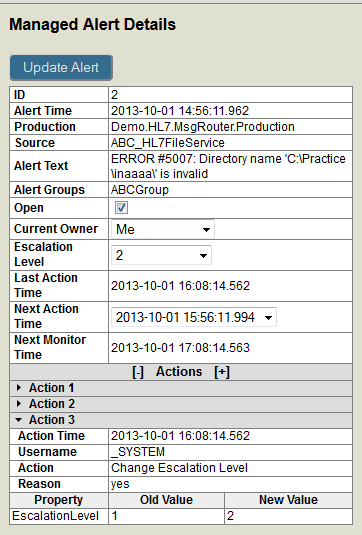
The Managed Alert Details form displays the following fields. You can update the Open, Current Owner, Escalation Level, and Next Action Time fields.
-
Update Alert button and alert update reason comment field—after you update a field in the details form, the comment field is displayed. You must enter a comment and then click the Update Alert button to update the managed alert.
-
ID, Alert Time, Production, Source, and Alert Text—display the message ID, time of the initial alert, name of the production, name of the component causing the alert, and the text message defined for the alert.
-
Alert Groups—displays the alert groups associated with the alert.
-
Open check box—to close the alert, clear the check box, enter the reason you are closing the alert in the comment field, and click the Update Alert button.
-
Current Owner—you can set the current owner to yourself, to one of the listed users, or to unassigned. The user list includes all users who have any of the following roles: %EnsRole_Administrator, %EnsRole_AlertAdministrator and %EnsRole_AlertOperator.
-
Escalation Level—you can keep the escalation level unchanged, de-escalate the alert (which decrements the alert level), or escalate the alert (which increments the alert level).
-
Last Action Time—the previous time the alert was updated.
-
Next Action Time—the deadline for the alert to be updated or closed. You can leave the deadline unchanged, make the deadline earlier, or postpone the deadline by making it later. You can update the Next Action Time relative to its current value or relative to the current time.
-
Next Monitor Time—the next time the alert monitor will check the managed alert and possibly escalate it or send a reminder notification..
-
Actions—displays the history of updates to the managed alert. You can show or hide the details of each action by clicking on the triangle for that action. Clicking on the + (plus sign) expands all of the actions and clicking on the – (minus sign) hides the details of all actions. The actions can include a reoccurs action, which indicated that an identical alert was generated by the same component within a specified time period. The IsRecentManagedAlert() function adds this action to a managed alert.
Viewing Managed Alerts
The Managed Alert Viewer allows you to search and view all managed alerts that are stored in the database, including closed alerts and alerts assigned to other users, but you cannot update alerts from the Managed Alert Viewer. To access the Managed Alert Viewer, select Interoperability, View, and Managed Alerts.
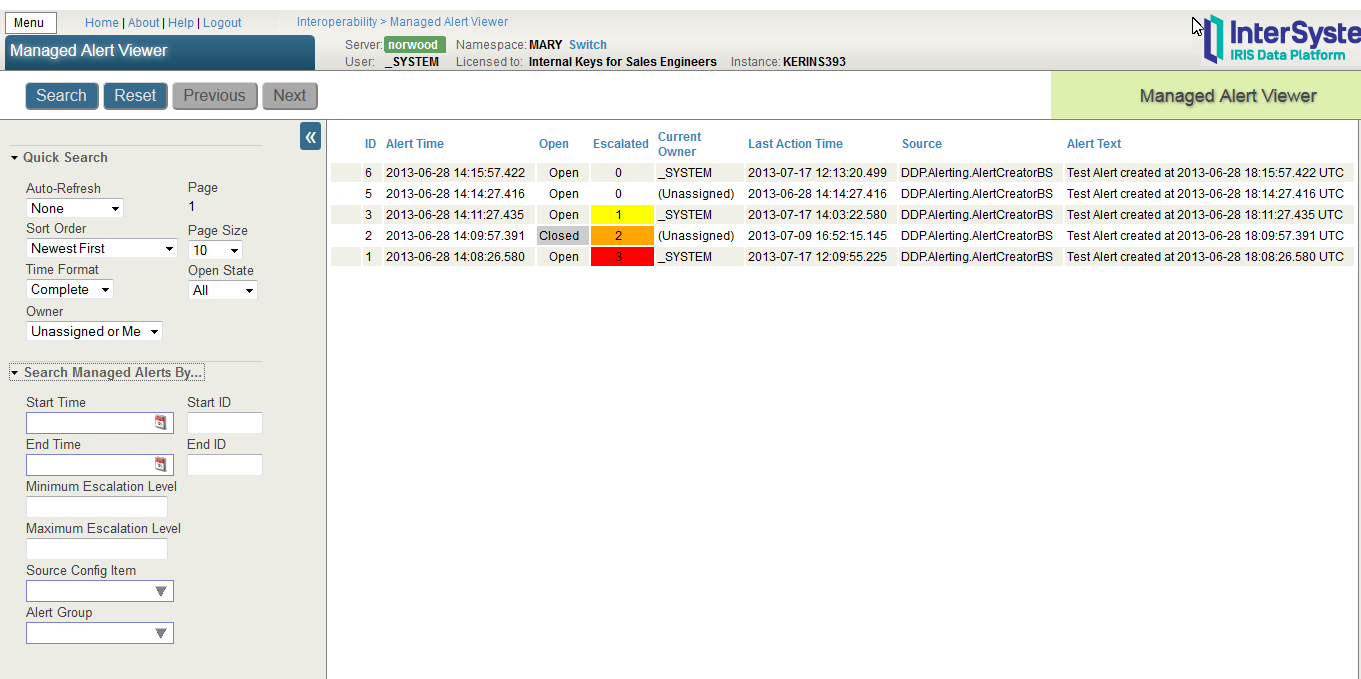
You can specify the search criteria in the left pane:
-
Quick Search
-
Sort Order—specifies whether InterSystems IRIS sorts the list based on the initial alert time or the escalation level.
-
Page Size—specifies the number of alerts to display on a page.
-
Time Format—specifies whether InterSystems IRIS displays the full date and time or just the time.
-
Open State—specifies whether InterSystems IRIS searches for only open alerts, only closed alerts, or all alerts.
-
Owner—specifies whether InterSystems IRIS searches for only alerts owned by the current user, only unassigned alerts, or all alerts.
-
-
Search Managed Alerts By ...
-
Start Time and End Time—specify the range of the date and time of the initial alert.
-
Start ID and End ID—specify the range of the alert ID.
-
Minimum Escalation Level and Maximum Escalation Level—specify the range of escalation levels.
-
Source Config Item—specifies the component that sent the initial alert.
-
Alert Group—specifies the alert group.
-
If you select an alert, the alert details are displayed in a panel to the right. The alert details panel displays the same information as described in the previous section, but you cannot update any of the values. Instead of displaying the alert state as a check box, the panel displays an open alert as 1 and a closed alert as 0.
Managed Alerts Example
You can start with any production with a router and a few different file Business Services bit that does not have alert code . Follow the instructions in this section to demonstrate alert management. In order to complete this example you must have access to an SMTP server to send email.
Because this is a example of a complex feature, it covers the important steps in the procedure but does not explicitly describe every user action. For example, it assumes that the readers know that they must enable each component in the production and respond to dialog windows.
Open a Sample Production and Delete Any Alert Processor
Open the production.
You will be modifying this production. If you want to retain the original code, you should export the production and then import it into another namespace. To export a production, select Production Settings, Actions tab, and Export button. To import a production, select System Explorer, Classes, and the Import button.
Before you continue on the example, you should make the following preparations:
-
Ensure you have access to an SMTP server. You’ll need to know the name and port of the server and have a username and password that provides access to the server.
-
Define credentials in InterSystems IRIS with the username and password to access the SMTP server. Navigate to the Interoperability > Configure > Credentials page, and then specify an ID to identify the credentials, a username and a password.
-
Define a user to handle alerts. You can use a user that you’ve already created on your system or define a new user. To define a new user, select System Administration, Security, and Users. Then click the Create New User button. In the example, we are using the username LabManager, but you can use any name. Give the user the following roles: %EnsRole_AlertAdministrator or %EnsRole_AlertOperator. The %EnsRole_AlertAdministrator role allows a user to update any alert, including an alert that is assigned to another user. The %EnsRole_AlertOperator role allows a user to update any alert assigned to that user and to update unassigned alerts.
Adding the Alert Manager, Notification Manager, Alert Monitor, and Alert Operation
Add the following components to your production:
-
Business process that must be named Ens.Alert with class Ens.Alerting.AlertManagerOpens in a new tab.
-
Business process named NotifyMan with class Ens.Alerting.NotificationManagerOpens in a new tab.
-
Business operation named EMailAlertOperation with class EnsLib.EMail.AlertOperationOpens in a new tab. You can skip this step if the production already has this business operation.
-
Business service named AlertMon with class Ens.Alerting.AlertMonitorOpens in a new tab.
All component names in this example are arbitrary except Ens.Alert, which is a required name.
Configuring the Production
Select Production Settings and the Settings tab. The following settings are in the Alerting Control group:
-
Alert Notification Manager—Enter the name that you specified for the Notification Manager. For this example it is NotifyMan.
-
Alert Notification Operation—Enter the name you specified for the email alert operation. In this example it is EMailAlertOperation.
-
Alert Notification Recipients—Enter valid email addresses, separated by commas. By default, the alert management sends all alert notifications to this email address list.
-
Alert Action Window—Enter a number of minutes. This is the default number of minutes that a user has to resolve and close an alert before the next reminder message is sent. For this example, you can leave this setting at the default 60 minutes.
For this and the other settings in this example, click Apply.
Select the EMailAlertOperation operation, and enter the following settings in the Basic Settings and the Additional Settings group:
-
SMTP Server—Specify the name of the server.
-
SMTP Port—Update the port if the server does not use the standard port.
-
Credentials—Enter the ID of the credentials that you defined in preparatory steps.
-
Recipient and Cc fields—You can leave these fields blank. If you enter email addresses here, all alerts that are sent through this operation will always be sent to these addresses in addition to any addresses specified by the production-wide settings. Ensure that any email addresses are valid.
-
From—Enter a valid email address.
-
IncludeManagedAlertHistory—Set to Oldest First.
You can leave the Alerting Control settings at their default values. You should ensure that the Alert On Error check box is not checked on the EMailAlertOperation operation or any of the alerting business processes or business operations.
If you are sending alert notifications to different distribution lists based on the component that generated the alert, it is useful to specify what alert groups each component belongs to. For large productions with many components, it is more practical to select a subset of alerts based on alert groups than on the individual component names. For this example, assign the alert groups, ABCGroup, XYZGroup, and NotImportantAlertGroup to the different business services. You should assign multiple groups to at least one business service.:
Starting the Production and Managing Alerts
You have completed adding and configuring the Managed Alert service, processes, and operation. You have not yet defined a rule or transformation so your alert management components provide their default behavior. This is:
-
Alert Manager promotes all alerts to managed alerts, leaves alerts unassigned, sets the deadline based on the number of minutes specified in the Alert Action Window, and sends all managed alerts to the Notification Manager.
-
Notification Manager sends all managed alert messages and reminders to the email addresses set in the Alert Notification Recipients using the operation set in the Alert Notification Operation. Both of these fields are in the Production Settings.
-
Alert Monitor queries for open managed alerts that have passed their deadline, resets the next notification time by adding the number of minutes specified in the Alert Action Window, sends a reminder notification, but does not escalate the alert.
-
Alert operation sends the email message to the distribution list and includes the managed alert history in the message.
The Alert Groups settings are not used with the default behavior. You will use them when you add rules and the transformation.
Start the production if it is not already running. In order to use the alert management system, you need to first generate alerts. One easy way to do this is to modify a file service File Path to point to a nonexistent directory. For example:
-
Modify the File Path on a file Business Service to specify an nonexistent directory and click Apply. The component should turn red.
-
Repeat with another file Business Service.
-
The production should have sent email to the addresses set in Alert Notification Recipients. Check and see if the email has been delivered to this account.
-
Select Interoperability > Monitor > My Managed Alerts. The two managed alerts should be displayed after you select the Unassigned and Today tabs. Select an alert. You can now update by reassigning the alert to yourself or another user, by making the next action time earlier or later, by escalating the alert, or by closing the alert. Once you have updated a field, you must enter a reason before you click the Update button.
-
If you do not close the alerts, the Alert Monitor will send a reminder message and update the NextMonitorTime when the current NextMonitorTime is reached.
-
You can also go to the Managed Alert Viewer by selecting Interoperability > View > Managed Alerts. This page allows you to query for alerts including alerts that are closed.
Once you have completed exploring the managed alert user interface, ensure that all managed alerts are closed. If there are any open managed alerts and the Alert Monitor is enabled, it will continue sending reminder messages.
Customizing Alert Management with Rules and Transformations
In this section you customize the Alert Manager and Alert Monitor by defining rules and customize the Notification Manager by defining a transformation.
Create an Alert Manager Rule
The Alert Manager rule controls whether a managed alert is created for an alert and can set some properties, such as the alert owner. To create a rule for the Alert Manager, follow these steps:
-
Select Interoperability > List > Business Rules.
-
Click New to create a new rule for the Alert Manager.
-
Enter the package name for the production.
-
Name the rule. For this example, name it AlertManCreationRule.
-
Select the type Creation Rule for Managed Alerts. This sets the context to Ens.Alerting.Context.CreateAlertOpens in a new tab.
-
-
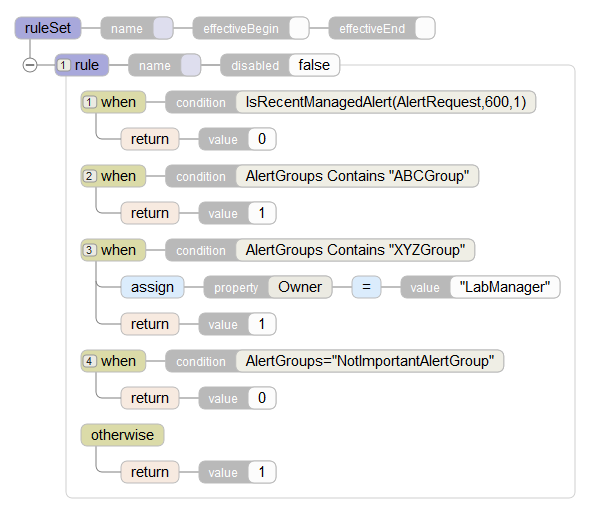
Use the rule editor to enter the following rule. Replace LabManager with an InterSystems IRIS username on your system.
-
Save the rule.
-
In the production configuration page, select Ens.Alert and set the CreateManagedAlertRule property to package-name.router-name.AlertManCreationRule.
Once you have added this rule, the alert management has the following behavior:
-
If the new alert has a corresponding open managed alert that was caused by the same production component, has the same alert text, and was created within the previous 600 seconds, the Alert Manager adds a reoccurs action to the existing managed alert and does not create a new managed alert.
-
Alerts in the group ABCGroup create unassigned managed alerts.
-
Alerts in the group XYZGroup create managed alerts assigned to the specified user.
-
Alerts in the NotImportantAlertGroup do not create a managed alert and are only written to the log. To test this, create an error in the operation that receives a message in this group and send it a message.
Creating a Notification Manager Transformation
The Notification Manager data transformation controls the operations that the targets for a notification and the destination addresses for the message. To create a transformation for the Notification Manager, follow these steps:
-
Select Interoperability, List, and Data Transformations .
-
Click New to create a new Data Transformation for the Notification Manager.
-
Enter the package name for the production.
-
Name the data transformation. For this example, name it NotifyManTransform.
-
Specify the Source Class as Ens.Alerting.NotificationRequestOpens in a new tab.
-
Specify the Target Class as Ens.Alerting.Context.NotifyOpens in a new tab.
-
-
On the Transform tab. set the Create property to existing.
-
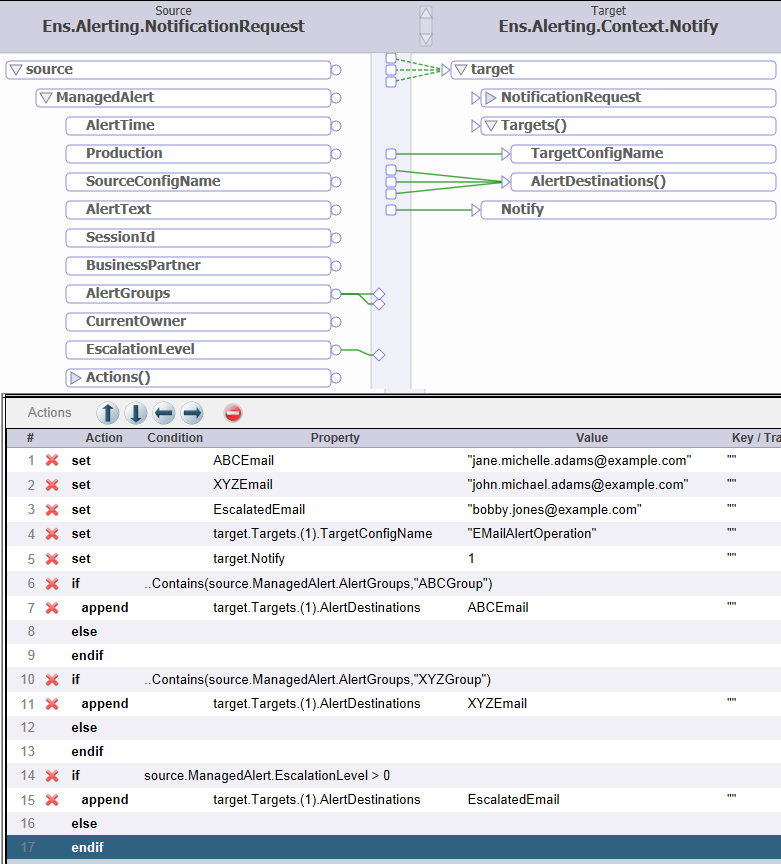
Add the actions shown in the following illustration.
-
Save and compile the transformation.
-
On the production configuration page, select NotifyMan and set the NotificationTransform to the transformation you created.
Once you have added this data transformation, the production has the following behavior:
-
Managed alerts with “ABCGroup” in AlertGroups are sent to the email address in ABCEmail.
-
Managed alerts with “XYZGroup” in AlertGroups are sent to the email address in XYZEmail.
-
Managed alerts that have an EscalationLevel 1 or greater are sent to the email address in EscalatedEmail.
Creating an Alert Monitor Rule
The Alert Monitor rule controls whether overdue alerts are escalated and whether reminder notices are to be sent. To create a rule for the alert monitor, follow these steps:
-
Select Interoperability . List > Business Rules.
-
Click New to create a new rule for the Alert Monitor.
-
Enter the package name for the production.
-
Name the rule. For this example, name it AlertMonitorRule.
-
Select the type Overdue Rule for Managed Alert. This sets the context to Ens.Alerting.Context.OverdueAlertOpens in a new tab.
-
-
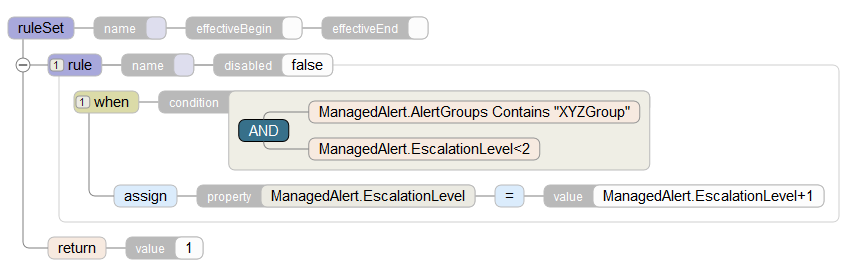
Use the rule editor to enter the following rule:
-
Save the rule.
-
In the production configuration page, select AlertMon and set the OverdueAlertRule property to rule you created.
Once you have added this rule to the production, it has the following behavior:
-
Any managed alert in “XYZGroup” with an escalation level of 0 or 1 will have its escalation level incremented when it passes through the alert monitor.
-
Since the rule does not assign a new value to NewNextActionTime, the Alert Monitor has its default behavior, which is to set the NextNotificationTime to the current time plus the number of minutes specified in the AlertActionWindow property.