

FHIR Explorer
The FHIR Explorer lets you quickly build HL7® FHIR® queries based on your server’s capability statement, execute them, and display the results. This provides the opportunity to optimize your queries, and allows you to explore the data on your server.
The FHIR Explorer is organized into the following tabs:
Here you specify what server you wish to query, choose an authentication method, and provide the required credentials. After you provide these, the FHIR Explorer loads the capability statement.
This is where you build FHIR queries, specifying scope, resource types, and parameters. This interface provides two linked ways to develop your query:
-
Search Query provides a text box where you can type query elements directly.
-
Query Builder provides a series of fillable forms where you can enter individual parameters, operators, and values.
When you enter information in one method, that information is reflected in both. That is, if you enter a Resource type in the Search Query text box, that Resource type also appears in the relevant Query Builder form. Both methods feature autocomplete functionality based on the capability statement and the specified FHIR version.
Here you can view the data provided in response to your query.
You can access the FHIR Explorer in the following ways:
-
Open the Management Portal and navigate to Health > FHIR Server Management > FHIR Explorer.
-
Point a browser at {base-url}/ui/fhir-explorer/
For example: https://localhost/my_instance/ui/fhir-explorer/
Configuring the FHIR Explorer
On the Configure tab, you provide the address and credentials needed to contact the FHIR server you wish to explore.
To configure the FHIR Explorer:
-
In the Target FHIR Server field, either choose a base URL from the drop-down list, or enter the base URL for the desired FHIR server.
Note:When you enter a URL in this field, the FHIR explorer automatically adds it to the drop-down list to facilitate future use. To remove a URL from the drop-down list, select it, then click the trash can icon that appears to the right of the input box.
At this point the FHIR Explorer attempts to find the capability statement associated with the specified FHIR server. The autocomplete suggestions in the query building fields on the Build tab are based on information from the capability statement. If the FHIR Explorer cannot find the capability statement,it displays a warning banner, and autocomplete is limited to Resource types based on the specified FHIR version.
-
In the Server Authentication section, choose an authentication method from the Authentication Type drop-down list, then enter the appropriate credentials in the remaining fields:
-
For Unauthenticated, no credentials are required. It is not recommended to allow unauthenticated requests.
-
For Basic Authentication, enter the username and password.
This option sets the Authorization header as follows:
Authorization: Basic <base64 encoded "username:password">
-
For Bearer Token, enter a bearer token.
This option sets the Authorization header as follows:
Authorization: Bearer <base64 encoded token>
-
For X-API-Key, enter the API key.
This option sets the X-API-Key header as follows:
X-API-Key: <x-api-key>
-
-
Click Next to authenticate using the specified credentials and to switch to the Build tab. If you prefer not to authenticate, you can simply click Build to switch tabs.
Building Queries in the FHIR Explorer
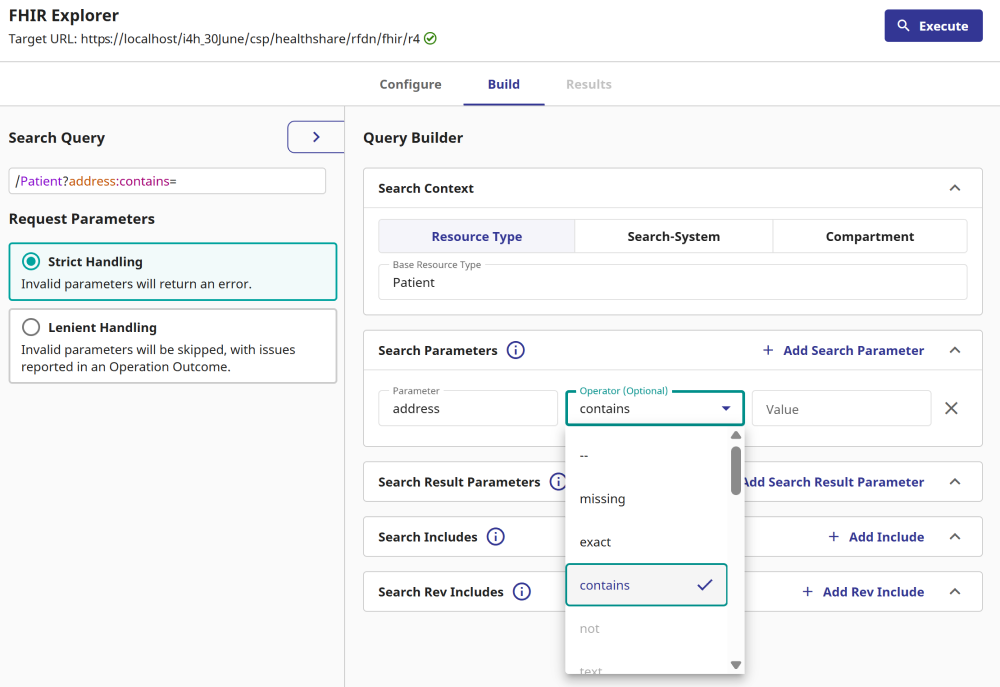
On the Build tab, you can create and test queries that make requests from your FHIR server. You can enter your query by hand in the Search Query field, or you can use the forms in the Query Builder area of the screen. Both methods feature autocomplete suggestions based on the specified FHIR version and capability statement.
The fields in the Search Query frame and the Query Builder frame are linked, so that entering information in the Search Query text box populates the equivalent fields in the Query Builder area, and vice versa. This makes it easy to go back and forth between the two interfaces.
To build and execute a query in the FHIR Explorer:
-
Decide the level of strictness you wish to apply to request parameters, then choose the corresponding radio button in the Request Parameters section, which sets the Prefer header for the query, as follows:
-
Strict Handling – Sets Prefer: handling=strict so that invalid parameters return an error.
-
Lenient Handling – Sets Prefer: handling=lenient so that Invalid parameters are skipped and reported in the Operation Outcomes on the Results tab.
For information about using the Prefer heading to specify handling, see PreferOpens in a new tab in the FHIR specification’s discussion of HTTP headers.
-
-
Determine the search context for your request, then click the corresponding button in the Search Context box.
-
Resource Type searches a single specific Resource type. For example, if you know you are looking for a Patient, choose this option.
-
Search-System searches on the union of multiple Resource types. For example, if you are looking for the most recently updated Resource, choose this option.
-
Compartment searches for all items related to a specific instance of a Resource. For example, to gather all information about Patient/123abc, choose this option.
-
-
Begin typing your query into the Search Query field. The FHIR Explorer responds as follows:
-
Autocomplete options appear in the Search Query field. For example, if you type “Pa”, you will see autocomplete suggestions for Parameters, Patient, PaymentNotice, and PaymentReconciliation.
-
Additional forms appear in the Query Builder area, which allow you to add search parameters, search result parameters, includes, and revincludes.
-
The information you entered in the Search Query field populates into the corresponding fields in the Query Builder.
-
-
Continue constructing your query, either by typing in the Search Query field or by choosing the + Add ... buttons and entering text in the Query Builder fields. Both methods offer autocomplete options based on the specified FHIR version and capability statement. You can go back and forth freely between the Query Builder and the Search Query text box.
-
When you are satisfied with your query, click Execute. Focus shifts to the Results tab, where you can view the results returned in response to your query.
Viewing Results in the FHIR Explorer
On the Results tab, you can view the results returned in response to your query.
The Results tab provides the following information:
The request that generated this response.
The length of time, in milliseconds (ms), that the system took to process the request.
The date and time at which the request was processed.
The status code returned with the query response. For example, 200 OK.
A list of any errors, warnings, and information messages associated with the request. You can use these, for example, to refine your query or troubleshoot your server.
For more information, see Operation OutcomesOpens in a new tab in the FHIR specification.
A table displaying the ID, Resource type, version ID, and the date and time of last update for each Resource included in the query results.
Click a row in this table to display the full JSON object for the selected Resource.
You can expand and collapse all blocks displayed in the JSON by clicking Expand All or Collapse All. To dismiss the JSON, click its X icon.