Production Validator
Production Validator helps you confirm that your production interfaces remain valid when you upgrade your InterSystems IRIS for Health instance. To do so, it extracts HL7 service headers, messages, and operation messages to a temporary database, which is then copied to an upgraded InterSystems IRIS for Health instance and replayed. By comparing the original messages to the messages processed on the upgraded system, you can evaluate and address differences.
Production Validator is supported only when both the source instance and the upgraded instance are InterSystems IRIS for Health version 2018.x or later.
You can access the Production Validator in the terminal. The comparisons are presented in a graphical interface on the Visual Comparison management portal page.
Metrics include the following:
-
Messages that were generated but should not have been.
-
Messages that are missing.
-
Messages that are different in content.
Validate a Production
The general workflow for using the Production Validator to validate your production upgrade is as follows:
-
Prerequisite: If necessary, procure and install the Production Validator code.
-
On the source system, gather baseline production data.
-
On the upgraded system, re-process extracted production data and compare.
Procure and Install Production Validator Code
Production Validator execution requires that the Production Validator code be installed in both the source system and the target system. Production Validator code comes pre-installed in versions 2024.1 and later. If either your source system or your target system (or both) is older than 2024.1, you will need to download the code and install it as follows:
-
Go to the WRC Distribution page under ComponentsOpens in a new tab and search for Production Validator.
-
Download and unzip the Production Validator ZIP file. Make a note of the name of the extracted file and the path to where you save it. Execute the remaining steps for the source system and/or the target system, whichever are older than version 2024.1.
-
Log in to the IRIS terminal associated with the relevant system, and set the namespace to HSLIB.
USER>Set $namespace="HSLIB" HSLIB> -
Write enable the HSLIB database to prepare for loading the Production Validator code.
write ##class(%ZHSLIB.HealthShareMgr).UpdateReadWrite("HSLIB",0) -
Set a string variable to identify the filename and path to the Production Validator code.
set file="<filepath>\<extracted_prod_validator_file>" -
Load Production Validator code.
do $system.OBJ.Load(file,"ck") -
Reset read/write permissions for the HSLIB database.
write ##class(%ZHSLIB.HealthShareMgr).UpdateReadWrite("HSLIB",1)
Gather Baseline Production Data
Follow these steps to create and export a JSON object describing production data stored in the source system database.
-
In the terminal, switch to the namespace associated with the existing production system. For example, if the production name is TESTING:
USER>Set $namespace="TESTING" TESTING> -
Create a template object for production message comparison.
set template=##class(HS.InteropTools.HL7.Compare.ProductionExtract).GetServiceList() -
Confirm the template contents by writing them in JSON format
zwrite template.%ToJSON()The terminal should display the expected data in JSON format.
-
Optional. After creating a template object for production message comparison, you can manipulate the object to configure your eventual results in the following ways, by setting element values at the terminal command line.
-
By default, the generated template will have tempDatabase="COMPARE-"<namespace> (in our example, COMPARE-TESTING) and tempDatabaseDir=$system.Util.ManagerDirectory()_tempDatabase (in our example, \mgr\COMPARE-TESTING). You can put the database elsewhere, potentially with a different name, by modifying the values of the template.tempDatabase and template.tempDatabaseDir elements.
-
By default, everything is exported. You can reduce output size and times by setting the template.percentage element to a lower value in the template. Permitted values range from 1 to 100. For example, if you set template.percentage to 10 (indicating 10%), every tenth record will be selected.
-
You can set the template.from and template.to elements in the template; these control the time span of data exported. The expected date-time format is YYYY-MM-DDTHH:MM:SS for local time. You can append Z for UTC or an offset (such as +HH:MM or -HH:MM) to specify a different time zone.
-
You can skip a particular operation by saving the JSON output to a text file, searching for the operation name, and adding the exclude element with value = 1 in the template. For example, to skip the operation called ADT_OPERATION:
{"name":"ADT_OPERATION","exclude":1}When you have finished adding all desired exclude elements, re-import the file using {}.%FromJSONFile(filename)
-
The workerJobs element can be specified in the template to control the number of background jobs used to process the data. When not specified, the system default number of worker jobs is used. For example, you can specify "workerJobs":0 to not use worker jobs.
-
-
Using the template object, export source production data to the database in tempDatabaseDir. In our example, the database is called COMPARE-TESTING and it is located in the <filepath>\mgr\COMPARE-TESTING directory.
write ##class(HS.InteropTools.HL7.Compare.ProductionExtract).Run(template)This should return 1, indicating successful data export.
-
Export the template object to tempDatabaseDir as a JSON file.
write template.%ToJSON(##class(%Library.File).NormalizeFilename(template.tempDatabaseDir_"template.json"))This should return 0, indicating successful export.
Re-process Extracted Production Data and Compare
Follow these steps to generate analogous messages in your upgraded system and compare them to the messages generated in your source system.
Prerequisites
-
Ensure that the upgraded system is configured identically to the source system, with the same production and supporting tables already configured.
-
If you are upgrading from an InterSystems Cache-based system, rename the Cache.DAT file to IRIS.DAT.
-
IMPORTANT: Copy your IRIS.DAT and template.json to a new location available to the target system.
Steps
-
In the terminal, switch to the namespace associated with the new production system. For example, if the production name is TESTING:
USER>Set $namespace="TESTING" TESTING> -
Set a variable to store the path to the template.json file.
set filename = "<filepath>\template.json" -
Create a JSON object from the template file, using the new variable.
set template={}.%FromJSONFile(filename) -
Confirm that the new JSON object is a valid object.
write $IsObject(template)This should return 1, indicating that template is a valid object.
-
Ensure that the template picks up the appropriate database of the upgraded system.
set template.namespace = $namespace set template.tempDatabase = "COMPARE-"_$namespace set template.tempDatabaseDir = ##class(%File).GetDirectory(filename) -
Use the JSON object to begin the import of messages from the source system.
set sc = ##class(HS.InteropTools.HL7.Compare.ProductionExtract).Import(template) -
Ensure that the import succeeded by checking the value of the status code variable sc. The value should be 1.
write sc -
Execute the comparison of messages from the source system to messages from the upgraded system, and store the results in a variable.
set stats=##class(HS.InteropTools.HL7.Compare.Compare).Run("Source","Target") -
View the comparison results.
zwrite statsThe output includes the following data:
-
compareStartTime—The beginning of the timespan of the comparison.
-
count1—The number of messages in the output from the source system.
-
count2—The number of messages in the output from the upgraded system.
-
missingFiles—The number of messages present in the source system output that are absent in the upgraded system output.
-
newFiles—The number of messages present in the upgraded system output that are absent in the source system output.
-
differences—The number of messages that exist in the output of both systems but that have different contents.
-
kpi—Percentage representing how close the upgraded system’s output is to the output from the source system.
-
compareEndTime—The end of the timespan of the comparison.
-
output—A link to the Visual Comparison page in the management portal, which displays a detailed listing of the differences between the two sets of messages.
-
-
To view the output of the comparison on the Visual Comparison page in the management portal, click the link in the output field. This page displays each message in tabular form with issues highlighted. There is also a link to the visual trace. You can use these tools to identify issues. Certain issues may be inevitable or uncorrectable, and the Visual Comparison page features links to filter some of these out of the output.
-
Optional. You can insert items to be ignored into a skip list table. Items in this table will not be included in the comparison output. For example, if the only difference between a message from the source system and the corresponding message from the upgrade system is that one is from production and the other is from testing, you might reasonably wish to skip that difference.
Set rs = ##class(%SQL.Statement).%ExecDirect(,"insert into HS_InteropTools_HL7_Compare.Skiplist (Segment,Field) Values (?,?)","<segment_name>",<position>)In addition to skipping specified differences in a field, you can skip entire rows if they are empty. To skip empty segments, insert into HS_InteropTools_HL7_Compare.Skiplist( Segment,Field,IgnoreEmptySegment) Values ('PV1','*',1). Entering these values will only skip the identified segments in which all fields are completely empty.
Note:The skiplist can be used to skip specific fields within a segment, but will require entering the value of the field names in the skiplist field.
See HS.InteropTools.HL7.Compare.SkiplistOpens in a new tab in the class reference for additional position options provided by other properties of the Skiplist class.
-
Optional. If you added rows to the skip list, recompute and refresh the Visual Comparison page to see the new results.
do ##class(HS.InteropTools.HL7.Compare.Compare).Recompute("Source","Target")Note:When using the Production Validator, the arguments of the Recompute() method should be the literal values “Source” and “Target” as shown in the example.
The following SQL query aggregates the number of mismatches by Operation and Document Type, which can help you identify specific areas of concern rather than clicking through the messages one by one:
SELECT Count(*), M.ServiceOperation, M.DocumentType
FROM HS_InteropTools_HL7_Compare.Temp T, HS_InteropTools_HL7_Compare.Message M
WHERE identical = 0 AND T.MessageRowID = M.ID AND M.RunIdentifier='Source'
GROUP BY M.ServiceOperation,M.DocumentType
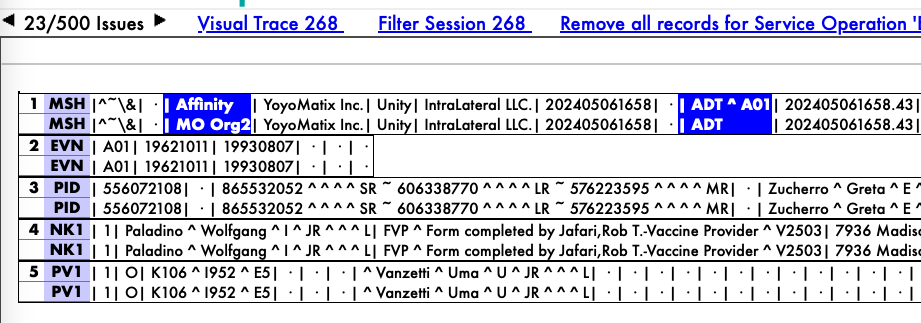
The Visual Comparison Page
The Visual Comparison page, located at Interoperability/Visual Comparison in the management portal, displays tables comparing the output from your source system to the output from your upgraded system.
-
Each table depicts a single message. You can navigate between messages by clicking the arrow buttons on either side of the issue number displayed above the table.
-
Each row represents a single segment of the displayed message, lining up output from the source system, position-by-position directly above output from the upgraded system.
-
The first cell of each row is the line number, and the second is the segment name.
-
Each cell from the third column onward represents a single position in its segment. You can learn the position number for a cell by looking at that cell’s tool tip.
-
Differences are highlighted.
For diagnostic purposes, the Visual Trace... link takes you to the visual trace of messages that yielded the message currently being displayed.
Two filter links are displayed above the table:
-
The Filter Session... link removes the currently-displayed message from the comparison output.
-
The Remove all records for <Service|Operation> link removes all records that match the specified service/operation pairing.