
Creating or Editing a Bulk FHIR Configuration
The purpose of a bulk FHIR configuration is to enable communication and interactions between the Bulk FHIR Coordinator (BFC) and other involved entities:
-
The client application seeking access to the BFC must be authenticated.
-
The BFC must be configured and authenticated to access the FHIR server, to request and receive data.
-
The BFC must store its output in a known FHIR export storage location.
Note:In most cases, output takes the form of ndjson files stored in a specified directory; however, you can configure the system to ingest output resources directly into a target FHIR repository. When you choose direct ingestion, you can optionally check the integrity of the output resources and store those that fail the check as ndjson files in a special directory. See “Bulk FHIR Storage Configuration” in Field Help for Bulk FHIR Coordinator Configuration.
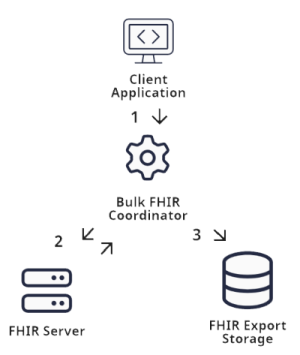
The BFC configuration interface is designed to reflect this workflow. The graphic above shows the relationships between the four main entities involved in Bulk FHIR actions, and a Bulk FHIR configuration provides the information necessary for these four entities to communicate with one another.
To create or edit a bulk FHIR configuration:
-
Log in to InterSystems IRIS for Health as a user with administrative privileges.
-
Navigate to Home > Health > FoundationNamespace > Bulk FHIR Coordinator
-
To access the configuration editor, do one of the following:
-
To create a new configuration, click + New Configuration.
-
To edit an existing configuration, locate the desired configuration in the list, and click the pencil icon in the Actions column in its row.
The configuration editor opens, displaying tiles representing parts of the bulk FHIR workflow. Clicking the pencil icon in one of these tiles opens a form where you can configure the fields relevant to that part of the workflow.
If you are creating a new configuration, enter a name in the Bulk FHIR Coordinator Configuration Name field.
-
-
One at a time, click on the pencil icon in each tile; fill out the forms using the field help below for guidance.
-
When you are satisfied with your changes, click Submit to save.
Field Help for Bulk FHIR Coordinator Configuration
The Client Authentication Tile
Specify the mode of authenticating the client to the Bulk FHIR Coordinator:
This field is required. This defines the type of authentication used to identify a bulk data client to the Bulk FHIR Coordinator. Select either Basic Authentication or OAuth 2.0. InterSystems IRIS for Health includes a utility that will configure an OAuth 2.0 server for you if you do not already have one.
For the Basic Authentication adapter, no additional settings are required. If you choose OAuth 2.0, the Bulk FHIR Coordinator OAuth Configuration tile appears.
The Bulk FHIR Coordinator OAuth Configuration Tile
Provide the information needed to authenticate the client to the Bulk FHIR Coordinator using OAuth2.0:
The URL of an existing OAuth 2.0 server. Required when using an OAuth 2.0 adapter. The OAuth server may be on the IRIS for Health instance or elsewhere. IRIS for Health includes a utility that will create an OAuth 2.0 server for you if you do not already have one.
Example value: https://example.org/oauth2.
When using an OAuth 2.0 adapter, this field is required. Enter the Application Name of the OAuth client configuration for the Bulk FHIR Coordinator as an OAuth resource server.
When a REST client presents a token to the Bulk FHIR Coordinator endpoint, the BFC Client validates the token with the OAuth server.
-
If the BFC Client configuration is not already defined then it will be created automatically when you save this bulk FHIR configuration, as long as your OAuth server supports dynamic client registration.
-
If your OAuth server does not support dynamic client registration, then you must:
-
Request that OAuth server administrator provision a client account on the OAuth server for the BFC resource server.
-
Manually add an OAuth client configuration on the Bulk FHIR Coordinator instance using the value in BFC Client Name by navigating to Home > System Administration > Security > OAuth 2.0 > Client > issuerEndpoint > Client Configurations.
-
A list of OAuth clients approved for performing bulk FHIR exports from this BFC endpoint.
To indicate which OAuth clients may use this BFC configuration, enter in the Clients field a comma-separated list of the form name:authentication_method where:
-
name is the Application Name in the OAuth client configuration.
-
authentication_method identifies which Open ID Connect workflow this client will use to authenticate with the OAuth server. The value for authentication_method must be either client_secret_post or private_key_jwt.
If the client configurations you enter do not already exist, they will be created when you save this bulk FHIR configuration, as long as your OAuth server supports dynamic client registration. Alternatively, you can create these clients manually.
See Configuring OAuth Clients for the Bulk FHIR Coordinator for more details about client setup.
The Bulk FHIR Coordinator Configuration Tile
Set up the access path to the Bulk FHIR Coordinator and its behavior:
Enter the URL for this bulk FHIR endpoint. This value is required and must be unique among configurations. It should be a relative value, for example /bulkFHIR/r4a. When you save this configuration, a web app will be created using this URL that will serve as the REST endpoint.
Check this box if export jobs should start as soon as a request is received. Uncheck if initiating an export requires manual approval before starting. Checked by default.
Optionally enter a comma-delimited list of non-administrative users who are permitted to perform exports using this configuration. A user who holds only the %HS_BFC_Exporter role must be listed as an authorized user in order to perform exports. This includes the dummy users associated with OAuth clients for the purpose of mapping roles.
A user who holds only the %HS_BFC_Exporter role will not be able to access Bulk FHIR Coordinator home page UI unless they are either provided a direct link to the page, or their startup namespace is configured to be the BFC foundation namespace.
FHIR Server Adapter Configuration
Specify the authentication type that the BFC will use to authenticate itself to the FHIR server:
Fetch Adapter Field
This field is required. Specifies the type of fetch adapter. The type of fetch adapter you choose determines what sort of interactions your BFC configuration will perform.
This dropdown contains the following options, in addition to any custom fetch adapters you may have created:
This type of adapter connects to any FHIR server that supports the $export operation. It uses the HS.BulkFHIR.Fetch.BulkFHIR.AdapterOpens in a new tab class.
This type of adapter is specific to United Care Record. System export is not supported for this type of adapter.
This type of adapter connects to an InterSystems FHIR server or any FHIR server that does not support the Bulk FHIR $export operation but does support $everything. It uses the HS.BulkFHIR.Fetch.PureFHIR.AdapterOpens in a new tab class.
You can also create a custom fetch adapter by coding a subclass of HS.BulkFHIR.Fetch.BulkFHIR.AdapterOpens in a new tab or HS.BulkFHIR.Fetch.PureFHIR.AdapterOpens in a new tab. If you do so, any subclasses you create will appear in this dropdown list as separate choices.
Choosing from this dropdown reveals additional fields:
-
The Authorization Settings section with the Authorization Type field.
-
The Adapter Configuration section, where the fields depend upon the option chosen.
The Authorization Settings Section
This defines the type of authorization used between the BFC and the FHIR endpoint when performing an export as well as what method you will use for authentication. Select OAuth 2.0, Basic Authentication, or X-API Key Credential. Subsequent Authorization Settings fields will be determined by what you choose from this dropdown.
Always present. The InterSystems IRIS SSL/TLS client configuration that describes how to communicate with the FHIR endpoint when using HTTPS.
Visible when you choose Basic Authentication in the Authorization Type field. The HTTP credential used to authenticate the FHIR server to the BFC.
You can set up credentials in the Management Portal at Interoperability —> Configure —> Credentials.
Visible when you choose X-API Key Authentication in the Authorization Type field. The X-API Key credential used to authenticate the FHIR server to the BFC.
You can set up credentials in the Management Portal at Interoperability —> Configure —> Credentials.
When you choose OAuth 2.0 in the Authorization Type field, the following fields appear, allowing you to provide the information needed to authenticate the BFC to the FHIR server using OAuth 2.0, and to specify the type of access to request from the FHIR server on behalf of the client:
The Issuer URL of the endpoint’s OAuth server. If this server supports discovery, a server description will be created for it when you save this BFC configuration.
The application name of the OAuth client configuratin that the BFC will use to authenticate with the FHIR endpoint’s OAuth server when performing an export.
This client configuration will be created automatically when you save this BFC configuration if the FHIR Endpoint’s OAuth server supports discovery and dynamic client registration. Alternatively, you may create this client configuration manually at Home>System Administration>Security>OAuth 2.0>Client>FHIRServerIssuerEndpoint>Client Configurations.
OAuth grant type to use when obtaining an access token from the FHIR endpoint’s OAuth server.
Depending on the client configuration’s Required Grant Types, the possible values for this field are:
-
password — Resource Owner Password Credentials
-
client_credentials — Client Credentials
Comma-delimited list of OAuth scopes to specify when obtaining an access token from the FHIR endpoint’s OAuth server. This applies only when the original request to the BFC did not use an access token. For example, system\*.read allows everything.
If Authorization Type is OAuth, any patient or group export requires a minimum of the system\patient.read scope in order to support the Patient/$everything operation that is used in the fetch to return both the patient compartment and related resources outside of the patient compartment such as Practitioner. Even if the _type parameter filters out Patient resources, the operation still requires the system\Patient.read scope, along with scopes for all other resources being retrieved.
The interoperability credential to use to authenticate with the FHIR endpoint’s OAuth server if a grant type requires basic authentication credentials. If needed you can update this dropdown by clicking Update Credential List.
The Adapter Configuration Section
Provide information needed to access and query the FHIR server.
The full URL of the FHIR endpoint. For example, https://example.org/fhir/r4. This field is required.
The comma-delimited default list of FHIR resource types that should be included in an export operation for this configuration. This list can be overridden by a client using the _type query parameter in the bulk data request. If this field is left blank, all resource types are included by default.
Select which type of exports are allowed:
-
Patient — the set of FHIR resources pertaining to all patients.
-
Group — the set of FHIR resources pertaining to all members of the specified Group resource. With the HealthShare UCR ODS fetch adapter, a Group resource is understood to be a Unified Care Record cohort.
-
System — all FHIR resources, whether or not they are associated with a patient. This supports use cases like backing up a server, or exporting terminology data by restricting the resources returned using the _type parameter.
Note:System export is not supported with the HealthShare UCR ODS fetch adapter.
Visible only when you choose HealthShare UCR ODS from the Fetch Adapter field.
Maximum number of HTTP(S) requests to make to the FHIR server endpoint each second. This number will be shared across all active export operations for the configuration, and may be used to limit the load imposed by the BFC on the FHIR endpoint. The default value is 10 requests per second.
Timeout value in seconds for each HTTP(S) request to the FHIR endpoint when fetching data. If your export is for a very large population and the endpoint has a large page size, you may wish to extend this timeout if you get timeout errors while fetching. The default value is 180 seconds.
Visible only you if choose HealthShare UCR ODS from the Fetch Adapter field.
The number of background workers assigned to do the processing. The default value is 4 jobs.
This field appears only when the value selected in Fetch Adapter is HealthShare UCR ODS, and it is required in that case.
The interoperability credential to use when calling the Hub web service at the Unified Care Record Registry.
This credential should match the Username Token Profile setting in the UCR service registry entry for the Hub web service. You can identify this service registry entry as it will refer to baseURL/services/HS.Hub.HSWS.WebServices.cls. The service registry entry is typically named HSREGISTRY. A typical value of the Username Token Profile setting in the HSREGISTRY service registry entry is HS_Services.
The username and password in the credential will be used when invoking the Hub web service at runtime.
This field appears only when the value selected in Fetch Adapter is HealthShare UCR ODS, and it is required in that case.
The Hub web service URL at the Unified Care Record Registry. Typically:
https://UCRHost:Port/csp/healthshare/registryNamespace/services/HS.Hub.HSWS.WebServices.cls
Visible only when you choose HealthShare UCR ODS from the Fetch Adapter field.
The value of the _count parameter to add to search and $everything requests. Setting this value over the default for the FHIR Server can speed up performance by reducing paging.
FHIR Servers may have a limit lower than the selected value for how many results will be returned per page and some FHIR Servers may not support _count for all request types.
Directory where temporary files are stored before they are passed to the storage file adapter.
The flush interval in minutes. When the interval is reached, the open ndjson file in the export is saved and a new ndjson file is started. Defaults to 60 minutes.
Visible only you choose Bulk Access FHIR Endpoint from the Fetch Adapter field.
The audience URL to be used to obtain an access token for retrieving ndjson files from the file server. Required if the file server is different from the FHIR server handling the kick-off and polling endpoints.
Bulk FHIR Storage Configuration
Specify the location of the downloaded content, how long it is retained, and how to access it.
Choosing a storage adapter from this list reveals additional fields, grouped in the Adapter Configuration section. To enable direct ingestion of exported resources directly into the target FHIR repository, choose FHIR Repository.
Relative URL path for the web application that serves bulk export files (for example, /file or /bulkfhir/file). Different configurations in the same namespace may use the same URL.
This URL varies depending on your web server configuration: if you employ a single web server for multiple InterSystems IRIS for Health instances, include the instance prefix.
Visible only when you choose Output File Server in the Storage Adapter field.
Storage location for ndjson files that contain the exported FHIR resources. If not specified, defaults to installDir/mgr/Temp/BulkFHIR/namespace/. This directory will contain numbered subdirectories for each session. Each session subdirectory will contain resource group directories and files. Distinct directories must be used between namespaces due to the potential for collisions in session identifiers.
Visible only when you choose FHIR Repository in the Storage Adapter field.
The storage location of ndjson files, which defaults to the instance mgr/Temp/BulkFHIR/$namespace/failed/ and will contain session directories. To avoid collisons in session identifiers, distinct directories must be used between namespaces. Files that fail integrity checks will be stored here as session_error_resourctype.ndjson, and only one per resource type.
Visible only when you choose Output File Server in the Storage Adapter field.
The maximum size of each ndjson file in bytes. When this limit is reached, the open ndjson file in the export is saved and a new file is started. Defaults to one million bytes.
Visible only when you choose FHIR Repository in the Storage Adapter field.
The time in minutes after which stored ndjson files expire. Defaults to 1440 minutes (one day). Any ndjson files that have expired are deleted by the Bulk FHIR expiration task that runs hourly by default.
This field appears only when you choose FHIR Repository from the Storage Adapter field on the Bulk FHIR Storage Configuration tile.
Check this box to perform integrity tests on exported resources. Resources that pass the tests will be ingested directly into the destination database. Resources that fail will be stored as ndjson files in the Failed Files directory.
Integrity checking ensures that any references in any object actually exist on the server or in the inbound set. For example, if integrity checking is in use and a resource contains an Encounter reference like Encounter.subject.reference='urn:uuid:<patient_ID>', a Patient must exist with that patient ID or the referenced Encounter would be dropped along with all other items that reference the Encounter.
Configuring the BFC for Direct Ingestion of Exported Resources
You can set up the Bulk FHIR Coordinator to integrate exported resources directly into the destination database rather than store them as ndjson files. This eliminates the need for the client to gather and integrate these resources. Optionally, the BFC can perform integrity checks on the resources. In this case, resources that pass the tests are automatically ingested, while those that fail are placed in the Failed Resources directory as ndjson files. The client can then integrate these resources in the usual way, at the discretion of the user.
To configure the BFC for direct ingestion of exported resources, set these fields on the Bulk FHIR Storage Configuration tile:
-
From the dropdown in the Storage Adapter field, choose FHIR Repository.
-
Optionally, to instruct the BFC to execute integrity tests on the exported resources, check the Integrity Check checkbox.
-
The Failed Files Directory field specifies where files that fail the integrity check will be stored. It defaults to mgr/Temp/BulkFHIR/$namespace/failed/. If desired, you can choose a different directory.
Configuring OAuth Clients for the Bulk FHIR Coordinator
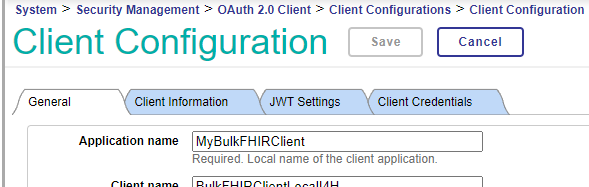
Your OAuth server should have a set of OAuth client descriptions defined that match the OAuth client configurations in Home > System Administration > Security > OAuth 2.0 > Client > issuerEndpoint> Client Configurations.
Each OAuth client configuration has an Application Name (indicated on the General tab).
Each OAuth client configuration also has a Client ID and Client Secret (indicated on the Client Credentials tab).
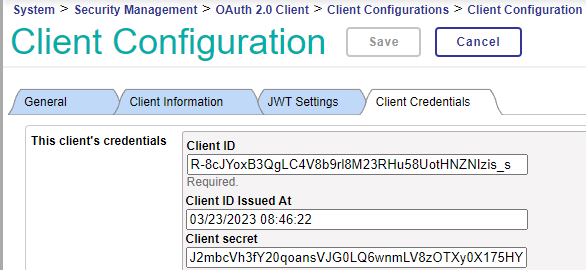
When a bulk data REST client sends a request to the BFC endpoint, the access token that it presents includes a client_id and client_secret. The access token’s client_id is validated against the Client IDs of the OAuth client configurations listed in the Clients field of the BFC configuration, and the client_secret in the access token is validated against the Client Secret in the OAuth client configuration.
Each OAuth export client must have both an OAuth client configuration and a dummy InterSystems IRIS user of the same name. The dummy user serves to map the appropriate roles to the OAuth client. See Setting up Users for detailed instructions.
The dummy user is used solely as a means to map user roles to an OAuth client, which enables a REST export client to engage in bulk FHIR interactions with this BFC endpoint. This user is typically created as “Not Enabled”, which prevents an actual user from logging in with those credentials.